Once upon a time, not too long ago, I gave my kitchen a makeover. It was red and aqua and bright and fun. As you know, I change my decorating style just about as often as I change my clothes (ok, *slight* exaggeration), so naturally, I’m due for changing things up a little. Or a lot, depending on how you think.;)
I started by buying these cute new stools for the island. There was a big sale going on last year, and I knew I had to take advantage, even though by doing so, my kitchen might look like it’s going through an identity crisis for a while. They were NOT vibing with my super bright aqua fun loving kitchen. Like, at all.
Oh well, I could deal for a little while, right? After all, I managed to convince my dear husband to expand the kitchen island and do all kinds of fun stuff, so THIS WAS HAPPENING PEOPLE. My new stools were going to look fahhhbulous, and all would be well with the world.
I went ahead and started painting the backs of the open cabinets a pretty blue-grey color….the bright colors were phasing out, as my love for rustic-industrial goodness began taking over.
And more and more months went by…with my bright aqua island with the honey oak finish top that PAINED ME LITERALLY EVERY DAY.
You see, being married to the ND ain’t always easy. The honey-do list is a mile long, and sometimes we can’t get everything accomplished, like yesterday, as much as I would like them to.
Sometimes people have jobs and limited time on the weekends.
Sometimes people have gallbladder surgery and are out of commission for a while.
The nerve!
(I kid! Love you honey! 😉 )
Point is, sometimes we don’t always have the funds or time to get our dream island. Or whatever it is you’re dreaming of that seems too hard to attain.
So I thought to myself,
Self, what could you do to make this island work for the next however many months it will be until we can make it REALLY what you want? Something that a) doesn’t cost much and b) doesn’t take TOO much time.
Hmmm…
I looked at the bright aqua island and the opposite looking rustic-y lovely stools and thought for a minute.
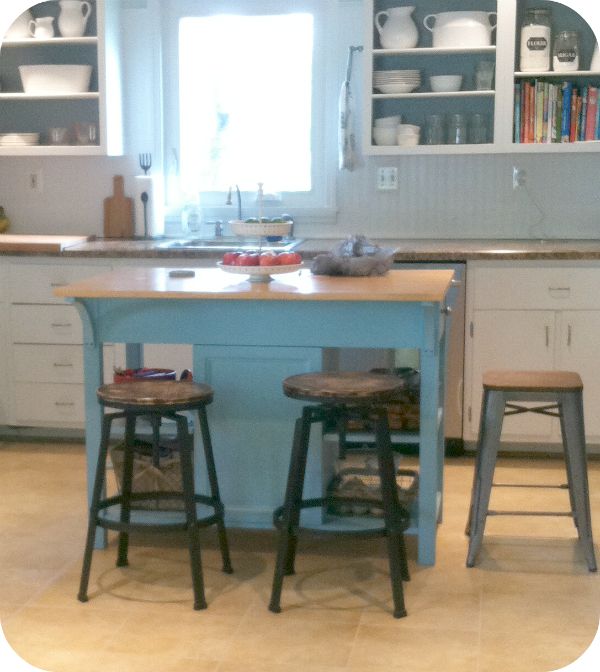
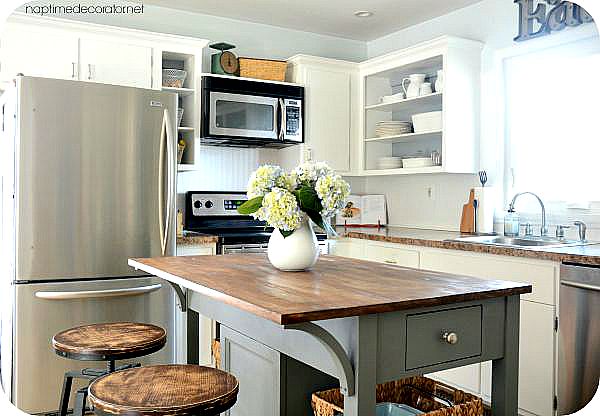
I decided if I painted the base, restained the top, and got cute baskets for the shelves that actually matched, I could totally live with this island for a while – until we can expand it and make it dreamy.
I took everything off the shelves. I wiped it clean. (Oh man, couldn’t even believe how beat up that blue paint was once I removed everything! It was WAY overdue for this makeover!). I removed the knobs. I picked up a $4 sample of Sherwin Williams Grizzle Gray. I mixed in about a spoonful of Plaster of Paris to make it ultra flat and go on swimmingly with no priming. I waxed it with Minwax Finishing Paste when it was dry. This whole process took about 3 hours-ish.
Now for the top. I tackled this on Day 2.
I borrowed my neighbor’s orbital sander that comes with an attached bag. This was key, because I sure as heck wasn’t taking that bad boy outside, yet I wanted to sand it down without making a gigantic mess in my kitchen. The bag caught most of the dust that comes off when sanding, but there was a tiny layer of dust – nothing I couldn’t handle though, and certainly not as much as it would’ve been had I used my hand sander!
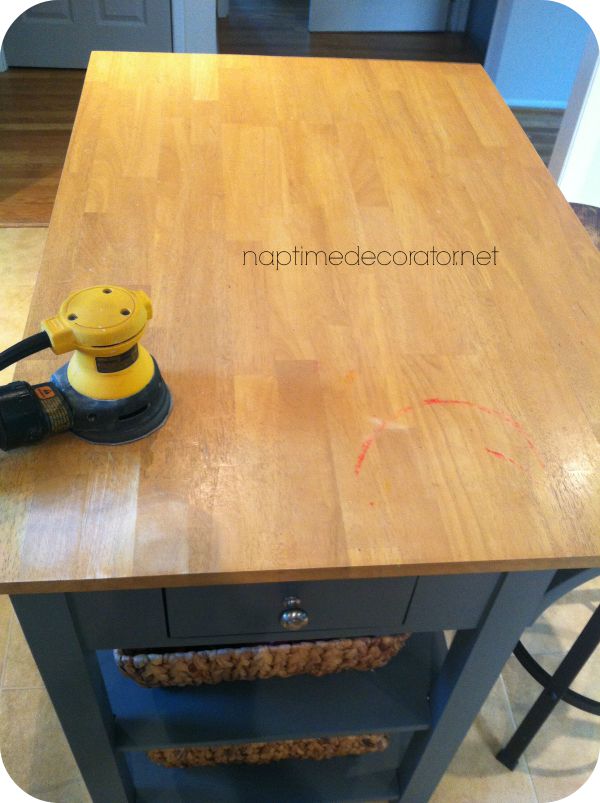
And that TOP! Oh the marks – I mean seriously, it was a SHOW. Marker, pens, paint, you name it, it was on there. I think I’ve actually been subconsciously encouraging my children to make a mess on there so we’d have no choice but to make it go away. So that was beyond overdue as well.
It took one hour to go from that to this:

I gave it a couple coats of Minwax Special Walnut stain (that part takes a couple minutes, tops), and the next day, I gave it two coats of Minwax Wipe On Poly to give it a sheen and protect it (again, a couple minutes).
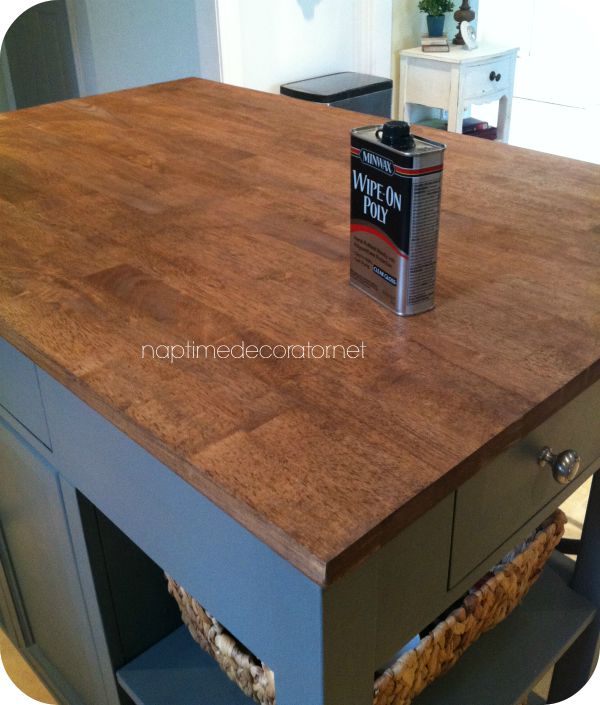
(That photo is pre-poly).
Now for the fun part!!!!!
Drum roll please….
Meet my new kitchen island!

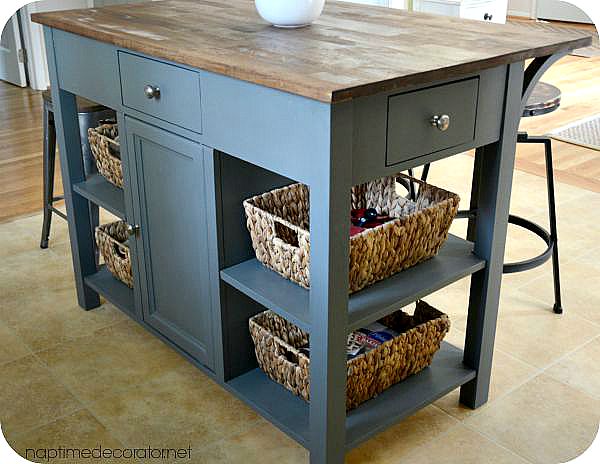
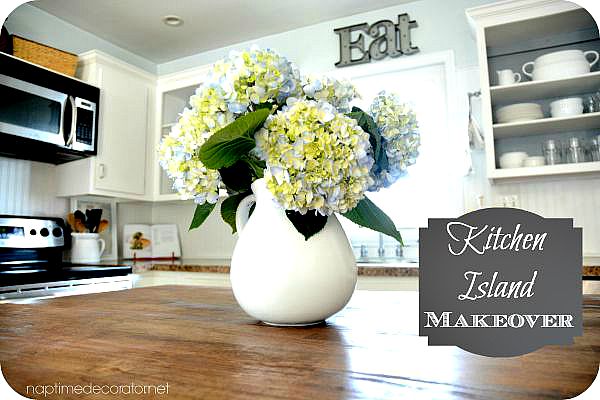
Eek! Do you love it?! I’m smitten. DOWNRIGHT. SMITTEN.
And I actually had those four baskets already – two were on top of my china cabinet (no biggie, though it does look a little naked – I’ll fix that!), and the other two were in the bottom of my dining room buffet (again, no biggie – I found something else to stick there).
So let’s tally this all up – I had ALL the supplies on hand except the $4 can of paint.
So yes, that’s right. This transformation cost me a whopping $4 and probably 5 hours of work when you add up both days. Even if we get around to expanding this island in 6 months (which probably won’t happen – I’ve got planked walls ahead of it on ‘The List’), I’d say it was worth every minute that I put into it for the happiness it brings me every time I look at it. It’s no more an eyesore, or a room going through an identity crisis. My new stools now match the look, and I couldn’t be happier with how it turned out. (And all you color lovers out there (I’m with you! Promise!) – I’ll be adding some more touches here and there. Stay tuned for more kitchen updates).
Here’s the lesson, folks. If something is driving you bananas, but it’s not in the budget or you just don’t have the time yet to really make it what you want, (like the honey oak topped aqua island was for me), if you can make it work for a while with a few hours of work and not a lot of money, it’s so worth it in the end. Now I don’t just “like” this island, I big fat love it. So very worth it.
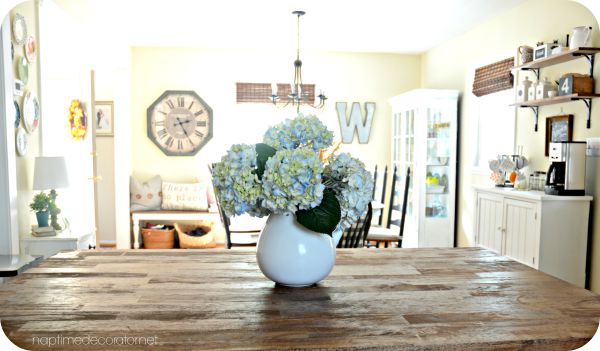
The old bright kitchen was awesome when I did it, and I really enjoyed it for a while, but it’s ok to want a change. I’m so happy the dining room and kitchen now mesh beautifully with each other. Makes my rustic heart oh-so happy…
Lesson learned.

 Hi there! I’m Liz, a former teacher-turned-stay-at-home mom to three kids, with a passion to create a warm and inviting home on a budget. This blog all started when I’d put the babies down for a nap, and squeeze in a project during those precious couple of hours! My hope is that you visit this page and feel inspired to do a little “naptime decorating” of your own. Thank you so much for stopping by!
So rich and expensive looking! Very nice improvement!!
Thanks so much!
Beautiful! Love the darker top! Very inspirational for people who want a big change but do not want to spend a lot! You really help people to see anything is possible! Love the sample sizes too!
Thanks so much, Jen!
Gorgeous!!
Thank you!
Where did you buy your island?
At an unfinished wood furniture store in MD called Barewood House.
I think I might try this with my kitchen table. It is old and gross with marker and crayon etc. doesn’t match my cabinets because it is a light oak instead of a darker caramel oak. You are AMAZING !!!!!!!!
Thanks, Corinne! Go for it!!
Looks beautiful!!! Did you find the stain went on the butcher block evenly? I’ve tried staining a piece in the past with very strange/splotchy results.
Thank you! Funny you should mention that – the stain wasn’t 100% perfect – I could tell where I swiped around. But I actually think in this case, that adds to the charm! 😉
I love it and want your Kitchen!!
Aw, thank you! 🙂
Have you ever had experience painting manufactured wood kitchen cabinets? Think IKEA laminate color cabinets? Just wondering what the painting commitment would be!!
No, I have not, sorry!!
I am IN LOVE with the way it turned out! Brilliant!
Thank you!
Where did you get the barstools?
Target
What type of floor do you have?
Peel and stick tile – there’s a blog post on it!
oh, that gold was a vinyl sheet – thought you were responding to a more recent island makeover post with my new floor!