Oh you GUYS.
This basement might just be the most dramatic makeover to date. Well, ok, I guess the Master Bathroom probably takes the cake on that one, but this is a close second! It’s getting so close to being done, but I couldn’t wait any longer to show you patient, patient people at least a sneak peek.
Last week I tackled the gallery wall above the sofa. We actually kept the same sofa, even though I’m not wild about it, because 1) it wasn’t in the budget, and 2) it’s kinda nice to have a sofa down there where the kids and their friends hang out all the time and not have to worry if their drinks and pizza are going to ruin it. There’s a LOT to be said for that. Plus, it’s slipcovered, so I can throw it in the wash (or buy a new one when the time comes – in a color I like more). Ok, I guess technically that’s three reasons, huh?
Moving on…
I reeeeeaaaallly want to show you more right now, but I’m gonna save all that for my reveal post. I can, however, show you how the gallery wall shaped up without giving too much away;)
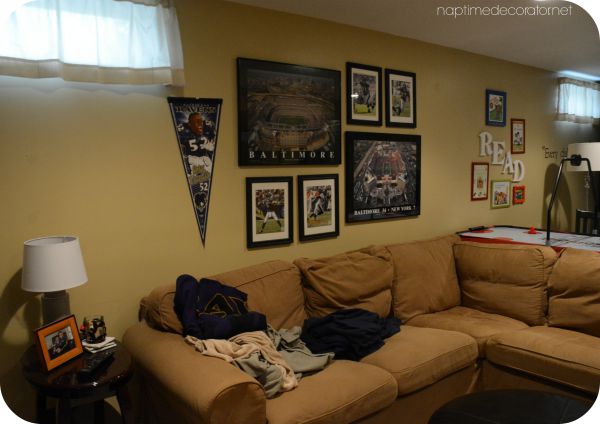
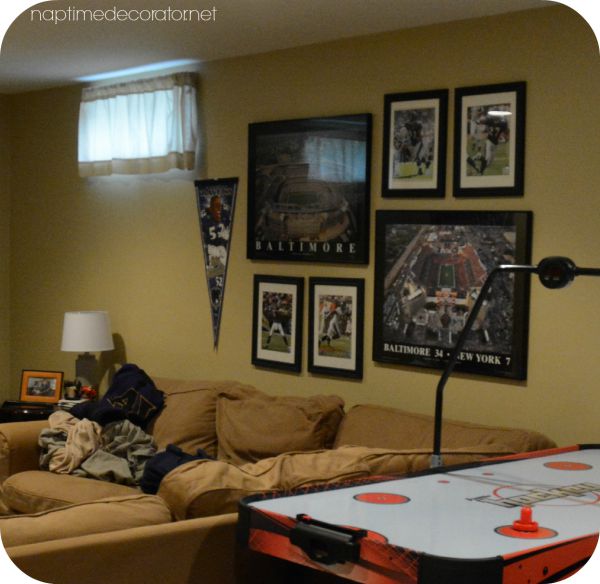
Let’s take a look at the before, shall we?
This perfectly sums up our ‘before’ basement. Half Ravens Man Cave, half kid zone. Except the kid zone was split in ‘toddler days library and art centers that are no longer being used’ and ‘big kid hockey table and arcade that ARE.’
Oh, and brown. Brown. And some more brown. I mean, wow. That’s a whooooole lotta drab right there.
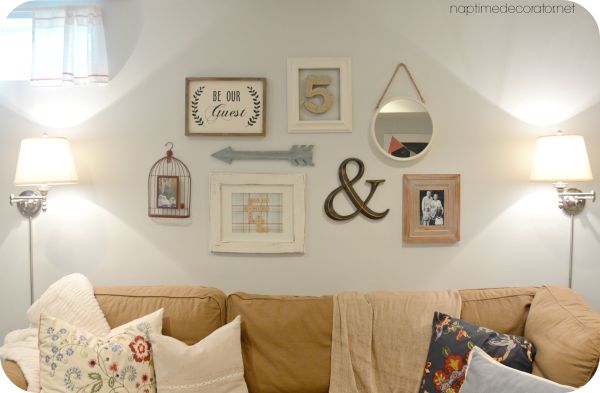
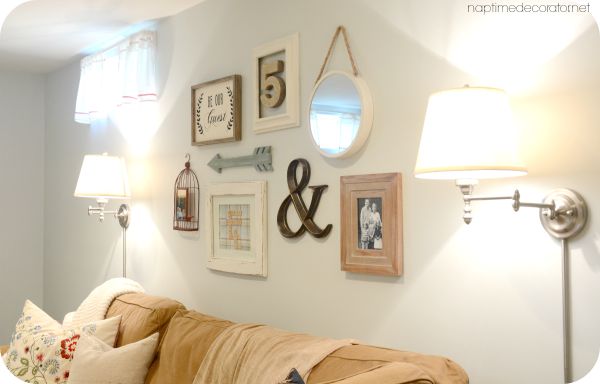
Let’s take a look at that wall now!
I mean, can I get an AMEN for paint?!!! And the #2 rock star when it comes to decorating: lighting. I talked about it briefly a couple posts ago with my new kitchen pendant, but people, it is SO. IMPORTANT. Those two wall lamps we got (from Lowe’s) were a game changer in this room.
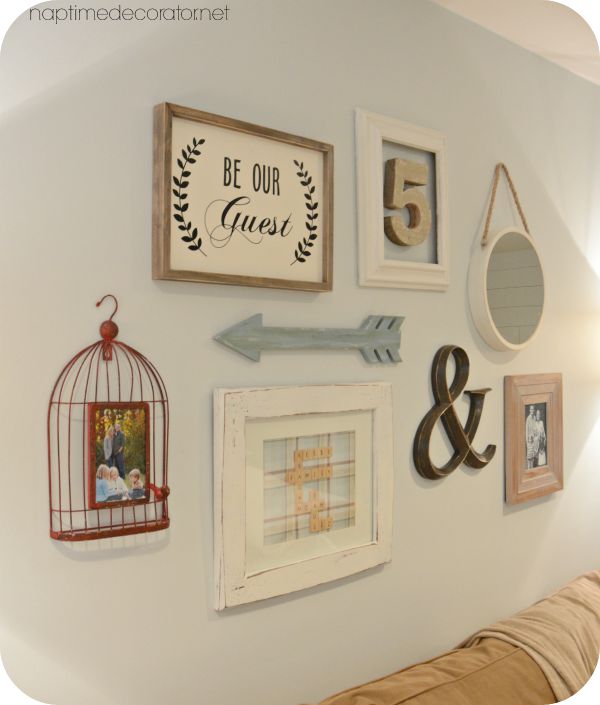
Let’s talk about my gallery wall process for a sec. First, I decide on the look I’m going for. There are SO many beautiful looks for gallery walls – for this one, I decided I didn’t want everything to be uniform. I wanted a mix of photos in frames and non-frame things. I wanted some color, but not too much. Once that’s decided, I dive into my stash of old picture frames, old knick knacks – anything that I think will work. I always keep in mind that if a frame is the perfect size but the finish is wrong, there’s always a quick coat of paint that’ll fix that. Once I take stock of my goods, and I know what I need to fill in the gaps, I run to my fave places – HomeGoods, Marshalls, Hobby Lobby – and grab a thing or two…or three (hehehe) to try out. I set it all out on the floor, and play around until it makes me happy. One thing I always do is pick one thing that’s a little larger than the rest of the items – just to give me a starting point – in this case, it’s that wooden frame (with the sideways photo of our wedding – don’t worry, we’ve got plenty others around this place;) ).
If I need to paint stuff, I go ahead and do that, and fill any empty picture frames with photos, and start hanging the most central piece first and work from there. Don’t be scared if you mess up – most likely the nail hole will be covered up by something anyway, and if not, it’s not the end of the world to fill a hole and dab paint on it (or be like me and live with nail holes showing – seriously, I mean to fill them, really, truly I do…just never seems to happen;). Just keep on hanging till you’re happy with what you see and a gallery wall is born!
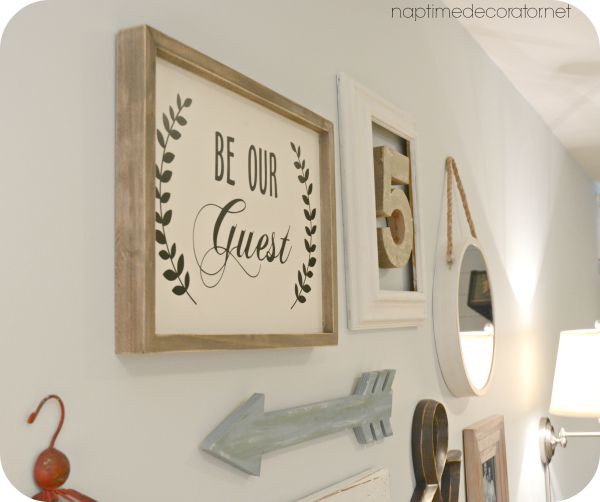
That red bird cage frame is from Hobby Lobby, as is the Be Our Guest sign, the ‘&’ sign, and arrow. The arrow was unfinished, and a whopping $2.50 (half off from $4.99) – I know, right?! So I added some blue paint…some green paint…some white paint…until it had a little character. The 5 is from a cute little local shop on our town’s Main Street (and represents the number of peeps in our little family). The frame around it was gold, and I gave it a coat of white. The round mirror was a HomeGoods find, and the wooden frame with the black and white pic is something I stole from my family room. Shop your home – always! And finally, that scrabble art is an old Craft Night project that I stuck in that frame (which was wood also and I painted and distressed it).
One more before and after…
And the same angle now…
I think this might be MY hangout now;)

 Hi there! I’m Liz, a former teacher-turned-stay-at-home mom to three kids, with a passion to create a warm and inviting home on a budget. This blog all started when I’d put the babies down for a nap, and squeeze in a project during those precious couple of hours! My hope is that you visit this page and feel inspired to do a little “naptime decorating” of your own. Thank you so much for stopping by!
Love it! What color did you paint the walls?
Thank you! It’s a custom color I had them create at Home Depot for me. I’ll take a pic of the can with the formula on it for the reveal post!
I didn’t even know you could do that! Looking forward to the reveal post!
I love the gallery wall! It looks great! I wanted to ask where did you get your navy floral pillow?
Thanks, Aarika! That was from Target, about 3 or 4 years ago.
Wow.
Wow.
It’s amazing how much better even your couch looks with the right decor and lighting! I cannot wait to see the full makeover.
Thanks, Heather! I said the same thing – the drab brown couch that I hated actually looks pretty nice down here now! Crazy!
Where is the slipcovered sofa from? As a family of five (plus two big dogs), I am totally digging the washability of this.
Ikea! It’s their Ektorp sectional. With kids, I’ll never buy a non-slipcovered couch again – I’ve got the Ektorp loveseat and sofa in our family room in a different color. They’re awesome!
Great job and what a difference paint and lighting makes!
I love it! You always make me want to try something new. Now I need to tweak my gallery wall. 🙂
Thanks so much, Christa!