So I had this wacky idea recently.
You know those gorgeous signs that are EVERYWHERE these days? They’re thin white painted wood (I’m guessing?!) bordered with a thin piece of stained wood? Kinda like my Be Our Guest sign that’s in my basement:
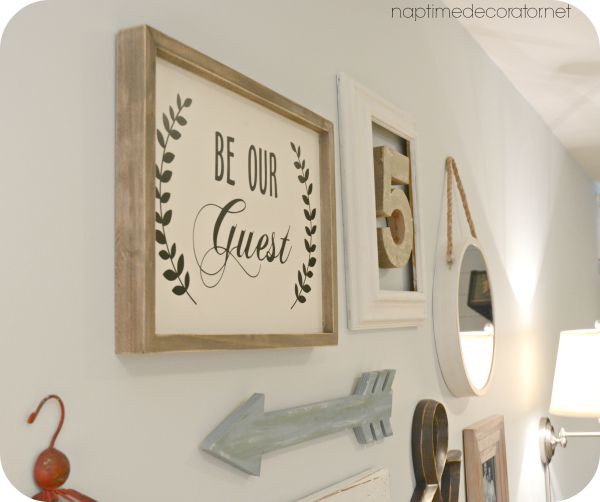
Well, I’ve seen them in stores. I’ve seen them online. They are NOT in the ND’s budget. I mean, I found this one in a local shop a while back, and it was soooo amazing – and it was $400. I kid you not. Granted, it was a huge sign, but WOWSERS.
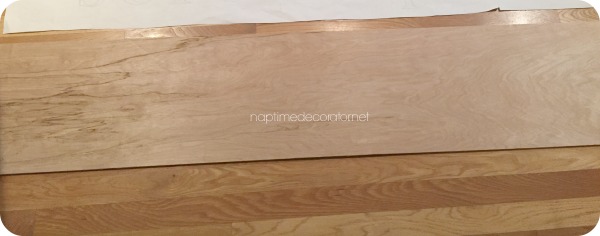
But I got to thinking last week about how I could make one. A long rectangular sign above my TV in the master bedroom would look awesome. Then I had this MAJOR aha moment – you know the cheap plywood I use for my plank walls? It’s a 4×8 piece of wood for about $11. What if I cut a 12 inch piece instead of 6 inch ones like I always do for the planks…so I hit up Home Depot and they did it for me (I need more planks for more walls anyway, so I had the sweetheart who was helping me cut 6 inch pieces with the rest of the sheet). I could paint it white…now, for the border…
I went walking around the wood/trim department and spotted this 1in x 1in x 8ft unfinished wood. If I stained it, and cut it, and glued it to the border of the white painted plywood plank…are you following?
And maybe – just maybe I could try freehanding some fancy lettering with a cute quote…hmmmm, this just might work!
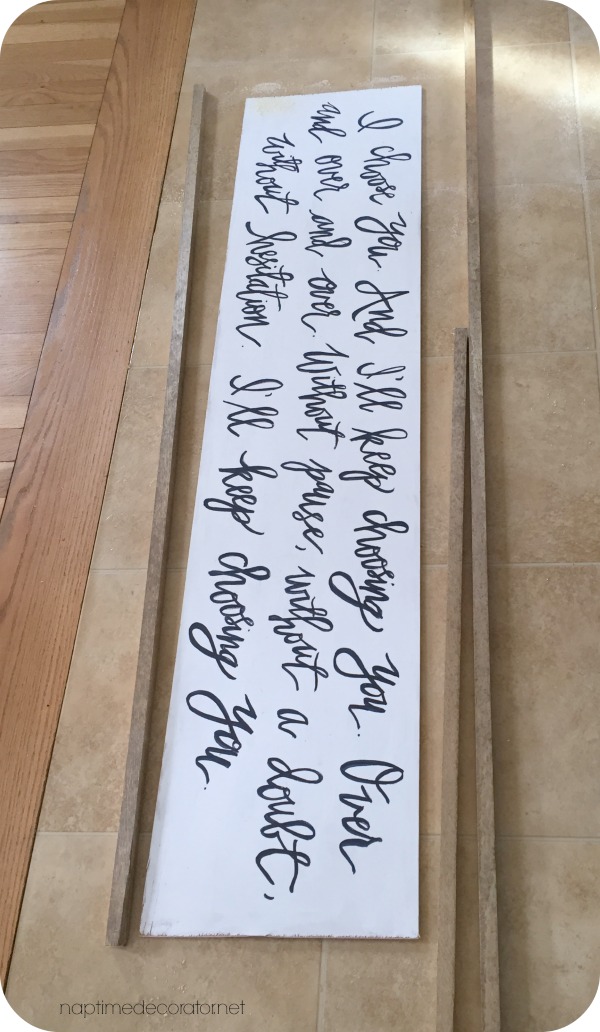
So I had my plywood and cut it (using just a handsaw) about 4 ft, 4 inches long. I knew I wanted a piece 4 feet, 6 inches long for above the tv, and the border would add an inch on each side:
I used some white craft paint and slapped on a couple quick coats.
Now, for the words…I looked online at a zillion signs, to try and figure out how they made those fancy pretty letters. And practiced a few hundred (only slight exaggeration) times until I thought maybe I could pull it off. I practiced on paper, and once I was happy, I cut everything out and made sure I had the right spacing/sizing:
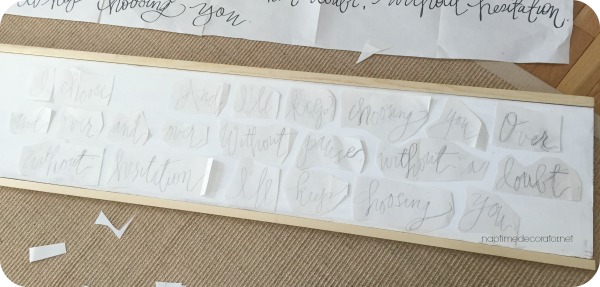
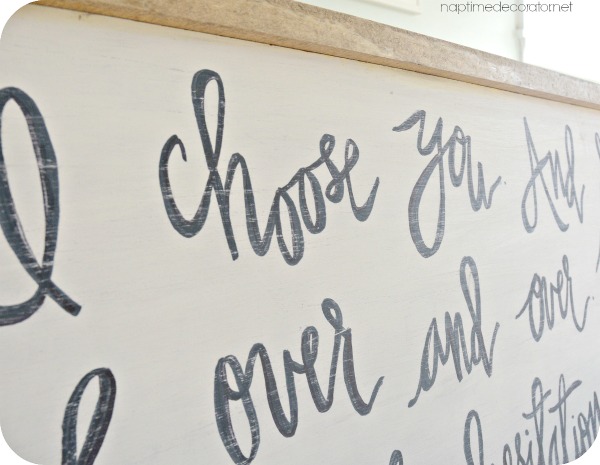
(You can see the unfinished wood trim in this pic)
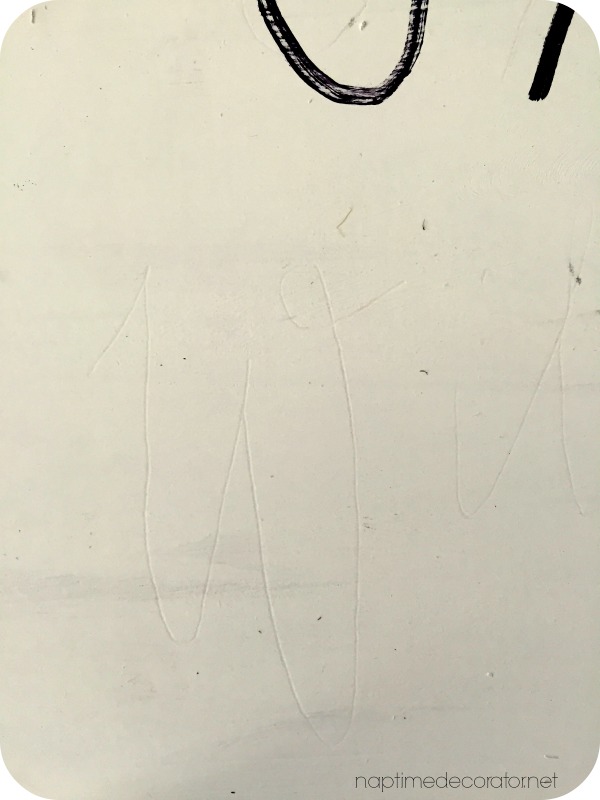
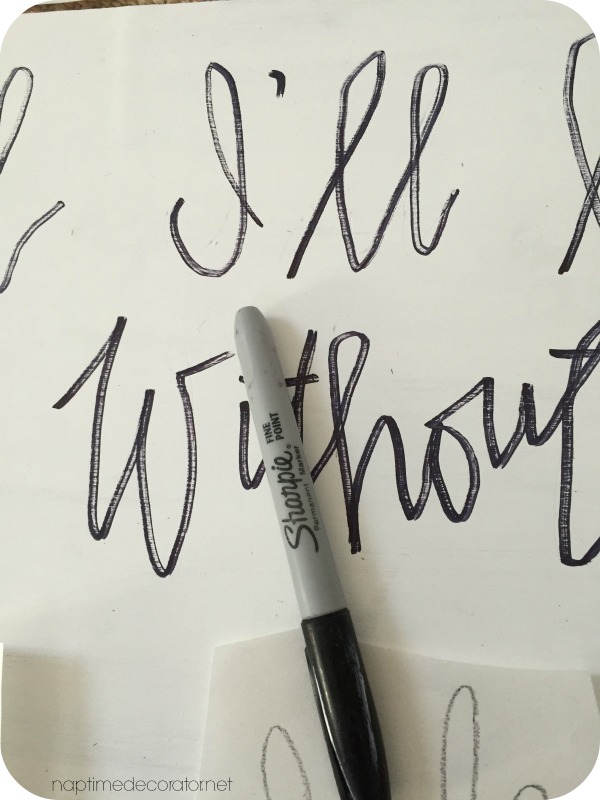
Then, I traced the words very hard with a pen, to make an indentation on the wood.
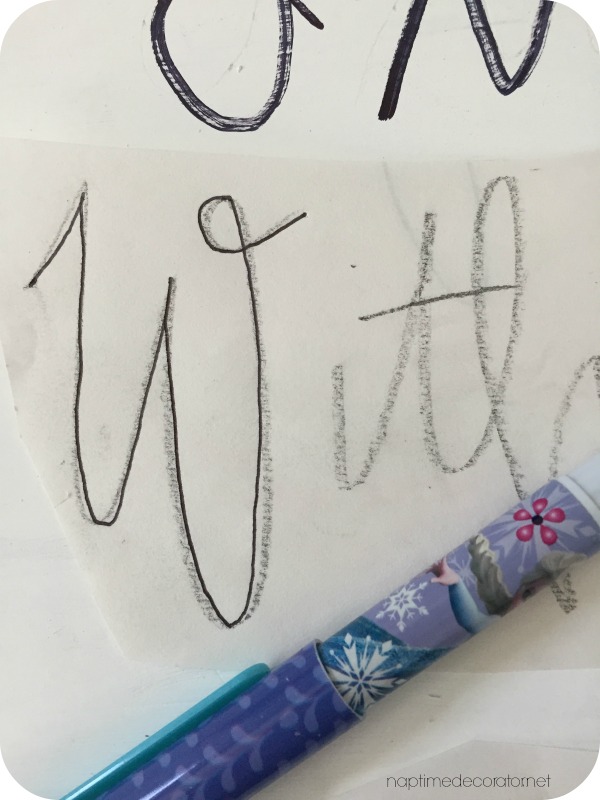
And went over the indentation with a Sharpie marker:
Then went over everything with a thicker marker, once I felt I hadn’t completely blown it and might actually have a chance at pulling this off!
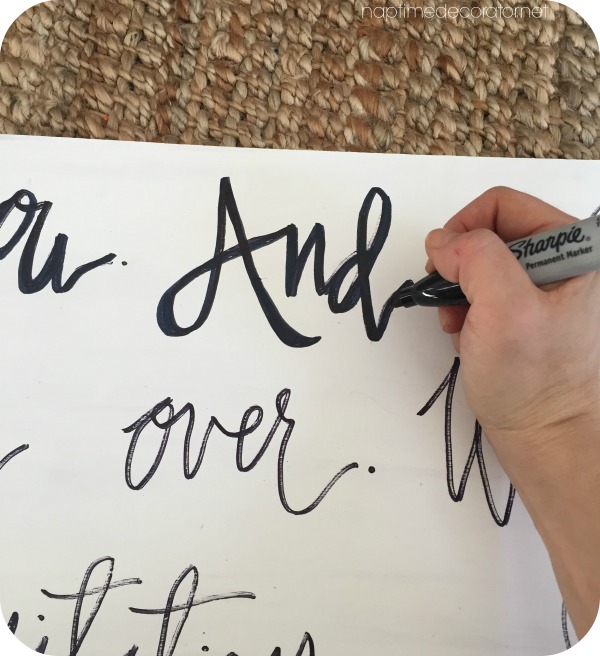
And just kept going…
When I was done that part, I got my border pieces out. (oops sorry, I meant to say I stained them with Minwax Special Walnut while this was all happening).
I measured and marked a line where to cut my wood, and used the same little handsaw to cut those pieces.
I wasn’t worried about mitering the corners or anything, because so many of these signs have that rustic charm of wood that’s imperfect and not mitered.
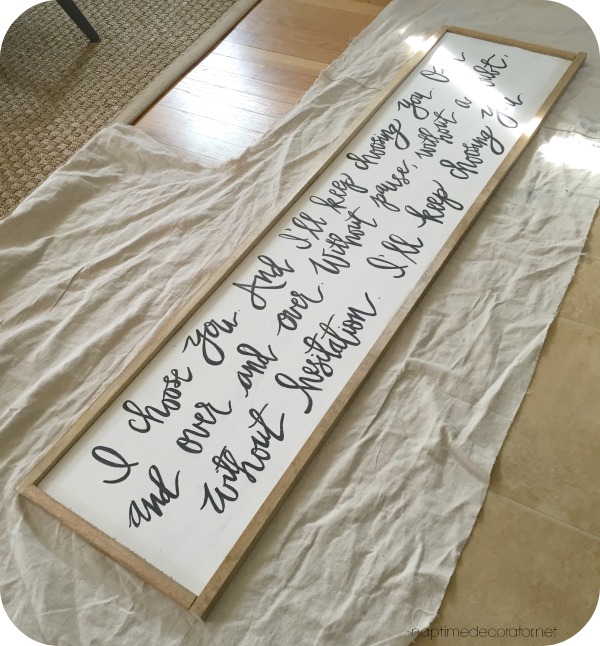
I used wood glue and just applied a thin layer all along the edges of the plywood, like a kid doing a craft project – nothing complicated – though I did wipe down the excess. Once that was done, I grabbed every heavy thing in my house to secure the wood in place while it dried!
Hahahaha – hey, it worked! 😉
Several hours later, I removed all the heavy items, held my breath, and was SHOCKED that this was ACTUALLY WORKING!!??
This morning I decided to take a piece of sandpaper and rough it up a bit. I was on the fence, but I decided, 99 times out of 100, when I’m on the fence about sanding, it always ends up looking better sanded. I’m glad I did with this – it adds to the charm.
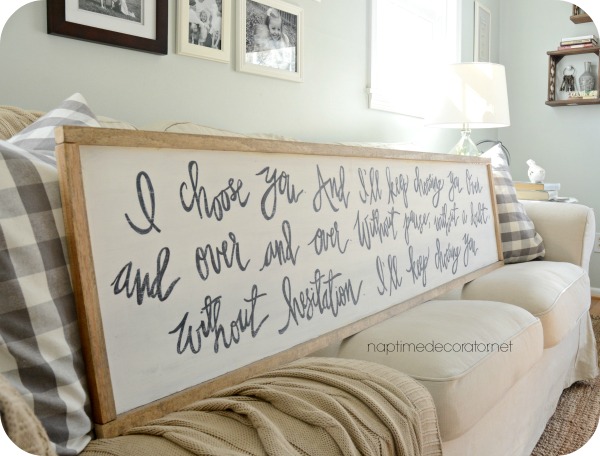
Ready to see my fakeout expensive sign?!!
Here she is!
In case you’re wondering about the quote…I did a google search for marriage quotes and found this one:
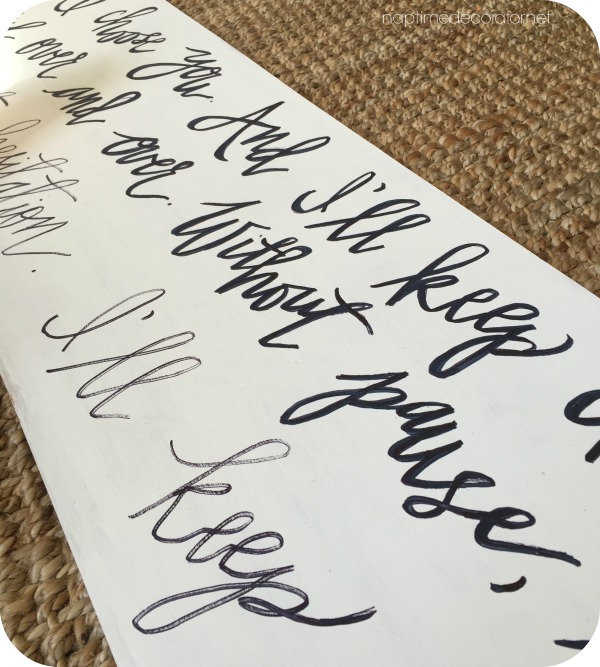
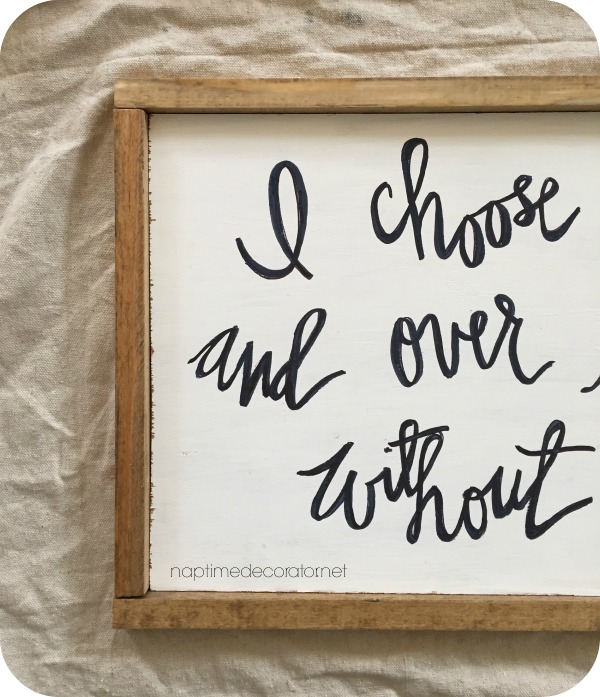
“I choose you. And I’ll choose you over and over and over. Without pause, without a doubt, in a heartbeat. I’ll keep choosing you.”
So yeah, ummm, have no idea why I started writing:
“I choose you. And I’ll keep choosing you. Over and over and over. Without pause, without a doubt, without hesistation (!?!). I’ll keep choosing you.”
So somehow my mind told my hand those were the words to write – and I didn’t realize it until I was 100% done – I was bummed I messed up at first, but then I thought, it’s pretty much the same thing, right?! And now I can say this is a Liz original – lol!
I just thought it was a beautiful saying for a bedroom. For the room my husband and I share. We can wake up each day, and see it, and smile.
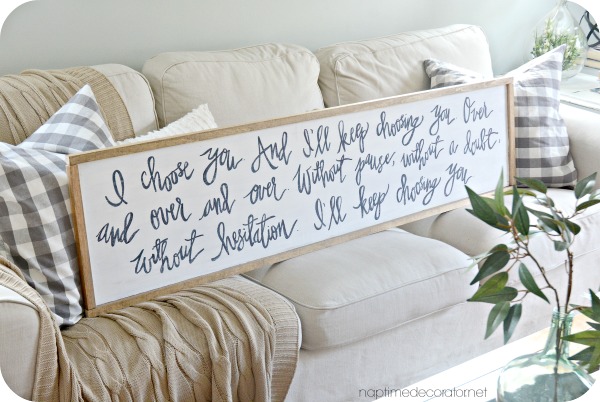
As you can see, I have yet to hang it (hoping maybe tonight) and can’t wait to show it to you in it’s place in the reveal (getting close!!!). It’s not perfect, and there are plenty of letters I messed up, but overall, I’m pretty pleased with it. Especially the price tag- it cost less than $20 to make. I’ll take it!

 Hi there! I’m Liz, a former teacher-turned-stay-at-home mom to three kids, with a passion to create a warm and inviting home on a budget. This blog all started when I’d put the babies down for a nap, and squeeze in a project during those precious couple of hours! My hope is that you visit this page and feel inspired to do a little “naptime decorating” of your own. Thank you so much for stopping by!
Liz,
This is awesome! I’ve been drooling over a certain wood sign for a couple weeks that is almost $200 but keep telling myself that surely I can make one for less! I am so doing this! Thanks so much for the inspiration…perfect timing:)
You can get a decal on Etsy fairly cheap. My son in law put my decal on painted wood with a gray border and it came out beautiful. Wish I could upload a pic!
Very cool, good to know, thank you!
Oh this is sooooo pretty!!!!!! It looks very legit, I must say!! lol!!
Love it!! Btw do you (or any of your fans) have a good quote for a laundry room that is also my craft room? I have the perfect wood for a sign but not sure what to say…….
“Crafting forever. Laundry whenever.” Not sure what your craft is, but my favorite sewing quote is “my soul is fed with needle and thread.”
“Whatsoever ye sew, so shall ye rip”. One day I’m going to make one of those for my office/sewing room….
The Laundry Room… Loads of Fun! 😉 I have this in mine 😉
That is so beautiful! I love it! And the saying, too! Gives me inspiration to make a sign that big!!!
Absolutely love it! Your lettering is perfect!
I love it, I’m planning on doing a project like this so it’s great to see how it turned out for someone else!
Have you ever thought of making some extra signs and selling them???
I love this sign! What font did you use?
Thank you! I freehanded it.
Such a great tutorial! I’m getting started on this project today! Can you tell me a little more about the trim you used? I’m trying to find it online before I venture into that enormous store, but I’m not having any luck.
I’m sorry, I don’t really have any other info, other than it’s 1in by 1in by 8ft. And bought it at Home Depot. Then I just cut it to size and stained it.Good luck, hope you find it! 🙂
I love this sign – you are so creative! I’m not sure I can pull it off, but saved the link to your directions. Thank you!
Thank you so much, Vicki!
Hi there! Could you please let me know what trim you bought for the frame? I walked all over Home Depot without any success. Do you know the price? Thanks so much!
I don’t recall the price, but it’s 1in x 1in x 8ft. Wasn’t much. Then I just cut it and stained it. Good luck, hope you find it!!
Would you at all consider making them to selling them? I NEED one!
Wondering about the trim used as well. Do you have anything more you could share about it? Cannot seem to find that size.
Sorry, don’t have any info other than it’s 1in x 1in x 8ft. Then I just cut it to size and stained it. Good luck!! 🙂
Hi,
What size is the plywood? Thank you!!
Been looking at making these signs! This was JUST what I needed. Love your idea for getting the font just right on the board. Can you tell me the kind and white color of craft paint that you used for the background?
Just white flat (matte) acrylic craft paint from any craft store! Thank you!
I love your sign and feel fairly confident after reading your tutorial that I could pull this off! Thank you! Does Home Depot cut your wood for free or is there a charge? I cant use a saw due to a disability that effects the strength and mobility in my dominant hand.
Thank you for sharing your projects and for your way of making them not be so intimidating!
I’ve had them cut big pieces for free, not sure if they’ll do these thin pieces or not, but worth a shot! 🙂 Good luck, thanks so much!!
beautiful sign, what type of font did you use?? thanks
thanks, I freehanded it!
LOVE this Liz. I definitely could not freehand like you did. They say imitation is the greatest form of flattery. Any chance of getting a straight on picture that I could have Staples enlarge in order to trace? You have lovely artistic pictures but the angle on them would throw off the aspect. You could go into business with these. Thanks
I LOVE this sign. I purchased a pretty pricy sign in this style for in my daughters nursery…😬But I know my husband only agreed because of the raging hormones lol. I’m going to make this for our room! I know you said that your sign was 4′ by 4″ (not including the trim) but it seems so much taller? If these measurements are accurate, how tall would you say your lettering is?
Thanks, Ashley! It’s a little confusing;) I cut the plywood in a 12 inch high strip, so it’s 12 inches high, but 4 ft 4 inches long (before trim). Hope this helps!
Thanks for the tutorial, I have a saying in my head, for over the bed (I think I’m channeling Dr. Seuss this morning). “Always kiss me good morning, Always kiss me good night, Always kiss me hello, and Always, Always kiss me good bye”…. Now I know how to make it, thanks!!!
Love it! 🙂
Liz, love the sign, was looking for a tutorial on how to frame a piece of luan. Can I ask what you used on the back for hanging on the wall?
I just nailed the entire thing flush into the wall. Thank you!