I almost titled this The Big, Scary, Questionable-Until-the-Very-End Closet Makeover…because that’s exactly what this was. I had this wacky idea, ran it by my husband…got the raised eyebrows. Looked it up online…found nothing.
Plank closet doors…
Shiplap closet doors…
Securing plywood to closet doors…
Closet Doors look like Plank Wall…
Make closet doors look like shiplap…
Gluing Mirrors to Bifold doors…
Maybe it’s because this is a realllly bad idea.
Maybe there’s a reason I can’t find any information or images of closets like this.
Maybe it’s because it’s impossible?!
But you know me.
I laugh at these kinds of challenges. 😉 And then I hold my breath…
So one day when my husband was at work, I decided to just go for it. I took the closet doors down, brought them downstairs and got to work.
Let’s hit the rewind button for a second though – (I tend to get excited and wayyy ahead of myself from time to time ALL THE TIME).
We’ve been working hard in our Master Bedroom Makeover. And it’s exactly how I envisioned it. The look, the feels, everything.
EXCEPT…
…for the hum-drum closet doors. Now, THEY ARE FINE. I have these bifolds all over our house in every room – no hate for the zillions of people out there with the same ones. Really. But for our pretty new room, I wanted to upgrade them. Make them really somethin’ special. So I thought…and I thought…and I lost sleep…and I thought some more. We took a hiatus from the bedroom for a couple weeks, as my husband wasn’t feeling great, and we were hosting kids’ bday parties and Easter. And I lost my motivation…
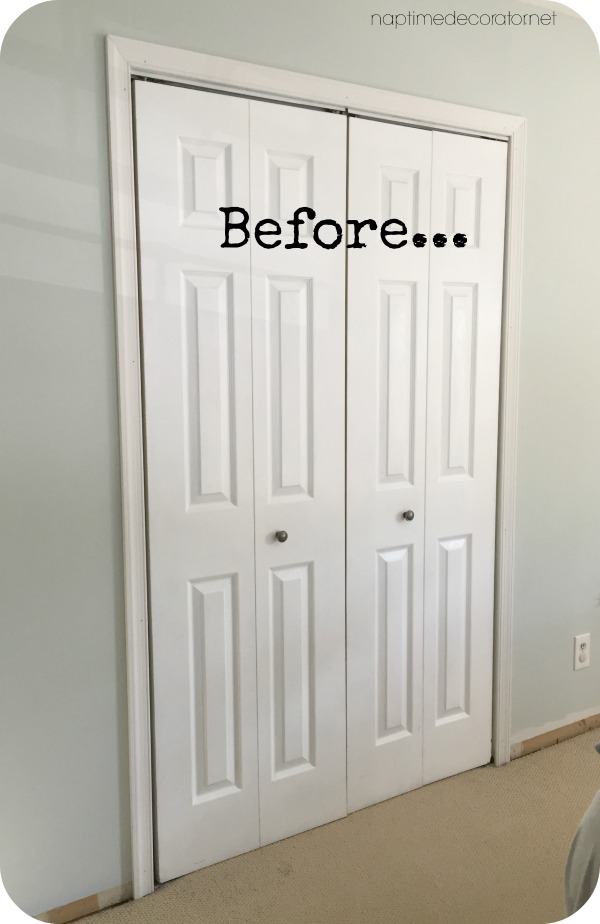
Until I was at Walmart picking up some Easter candy and happened to walk through the home department (because I can’t be ANYWHERE without a quick walk-through in a home department). I spotted these over-the-door floor length mirrors. They were pretty lightweight, but looked nice. Had a silver frame. And were only $22. I grabbed two and the wheels started moving…
I started imagining the two mirrors on my bi-fold closet doors. I envisioned bracing the doors to make them pull out from the center instead of folding in, painting the mirrors white, somehow securing them, and masking the fact that there were those panels behind them. Wasn’t exactly sure how it was all going to happen, but I was determined to figure it out.
I ran the idea by my husband- he was skeptical til the end, but God love him, he humors me. We braced the backs. That part I knew we could do. 😉
Then I got to painting the mirrors with some white chalk paint. (Why I didn’t get a full on ‘before’ shot is beyond me. Rookie mistake, I apologize).
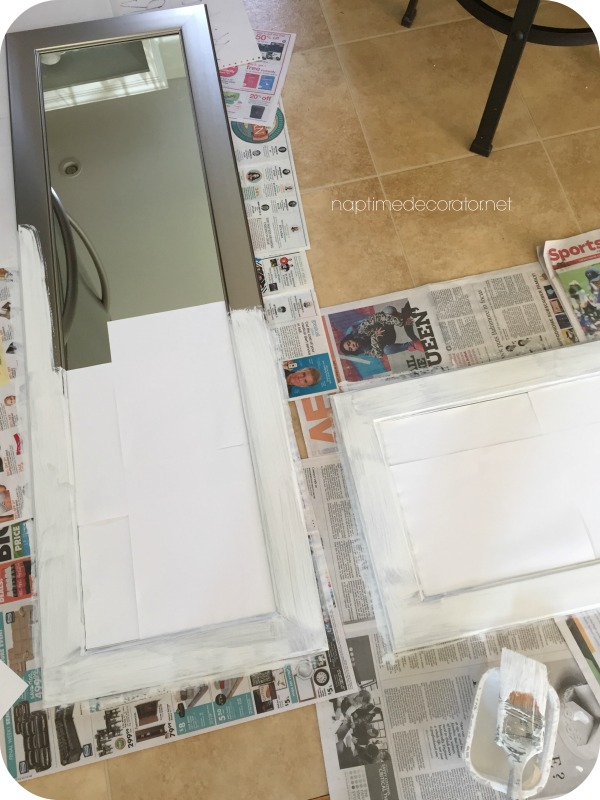
When they were dry, I decided to try and make them as lightweight and flat as possible on the back. Basically, I made a huge mess all over the dining room.
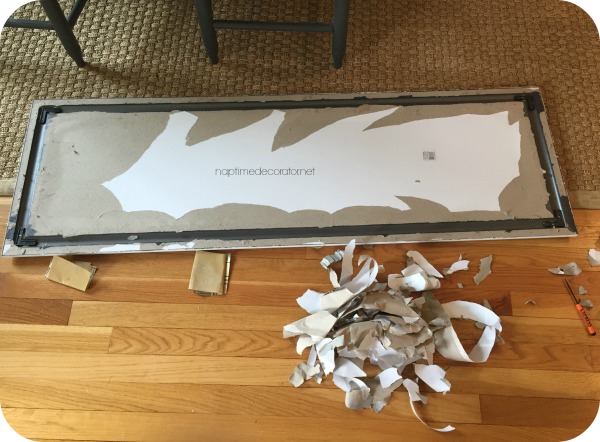
They had these metal pieces on the corners, where you could hang them if you wanted to, so I unscrewed those, and ripped all the excess paper off. I sanded them down so it was one even, flush surface all over.
I laid them on the doors and measured a gazillion times, marked the outline in pencil, and got out super-heavy-duty-premium-awesome-multi-surface Liquid Nails. (again, no picture. FAIL. I guess my subconscious really didn’t think this was going to pan out in the end;).
Again, I made a huge mess, and squirted it all over the raised panels, and a neater line all along the border of the back of the mirror.
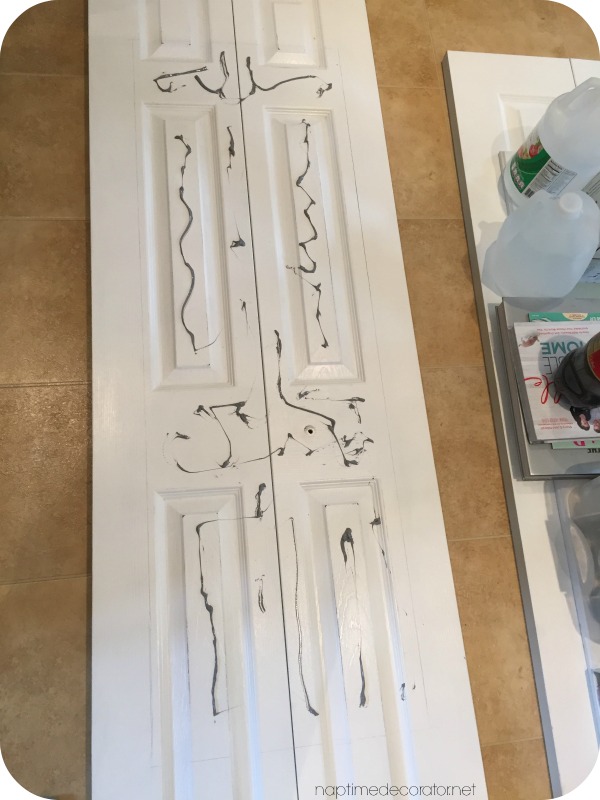
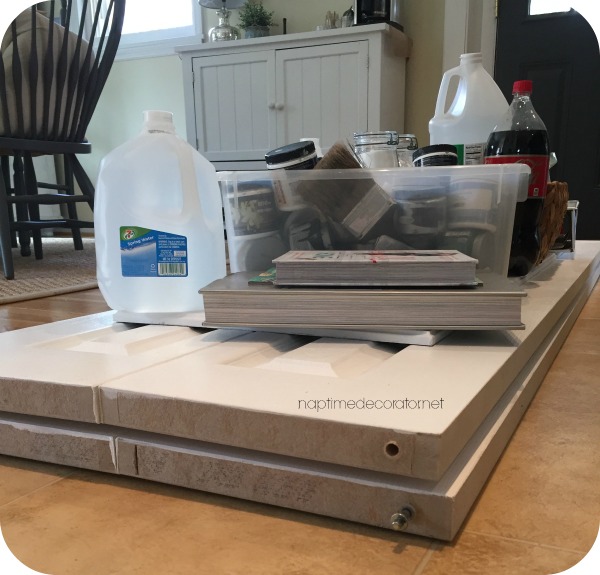
You can see a light outline in that above pic. I placed the mirror on top, and weighed it down with every heavy object I could find. Once I finished the second one, I realized I ran out of heavy objects, so I stacked them on top of each other and weighed them down. I am SO professional, aren’t I?
That was Phase 1. So far, so good.
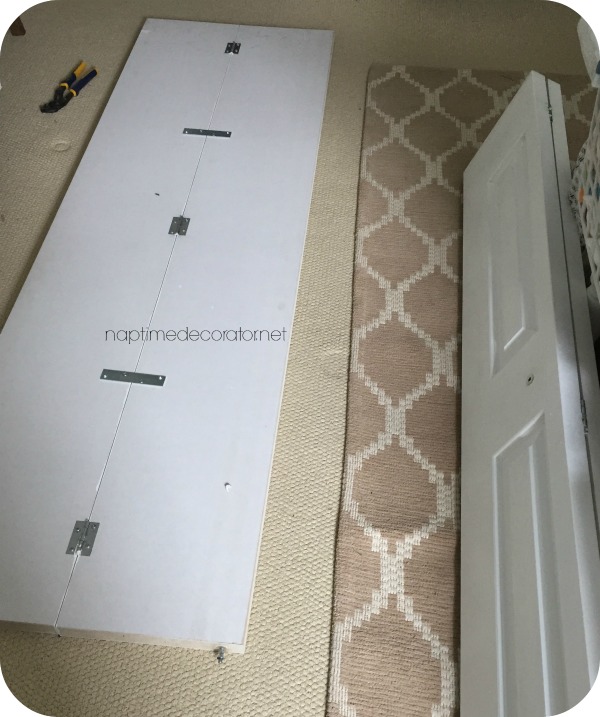
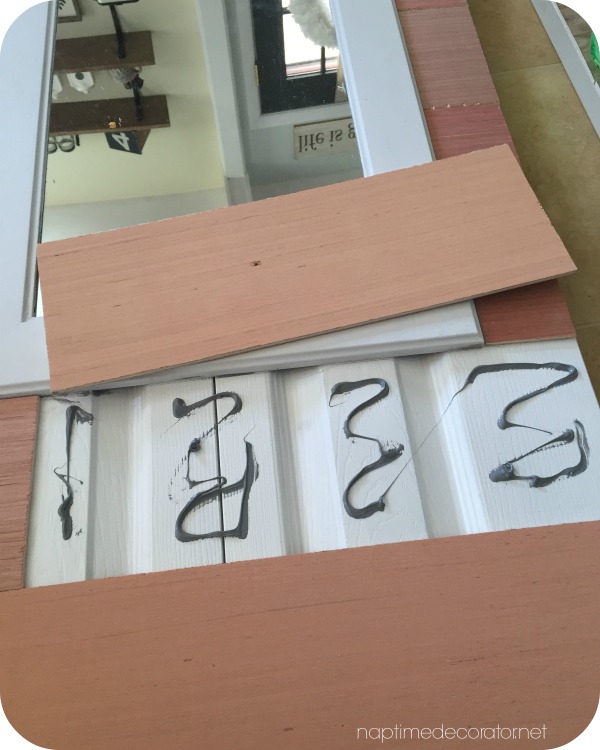
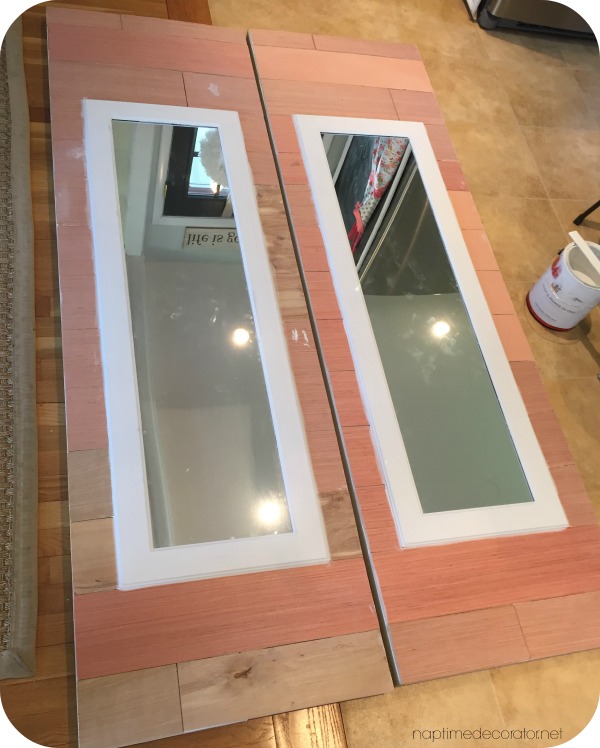
I decided the way I wanted to hide the panels was to make it look like a shiplap door! YES! And it’ll tie in my plank wall in the bedroom…this could potentially look amazeballs. Now, the reason I did this AFTER the fact of liquid nailing the mirror to the door was two-fold:
1. Had I done the plank part first, the mirror would’ve been secured just to that, and not to the door itself. I wanted the mirrors stuck on the actual doors, so it wouldn’t weigh the plywood down and make everything possibly fall off.
2. I was already scared this whole thing was going to make the doors too heavy (they are cheap hollow doors after all), so the least amount of wood the better.
Ok, so enter Phase 2:
Or as I like to call it: The Day Liz Got More Exercise Than She Has In The Past Ten Years.
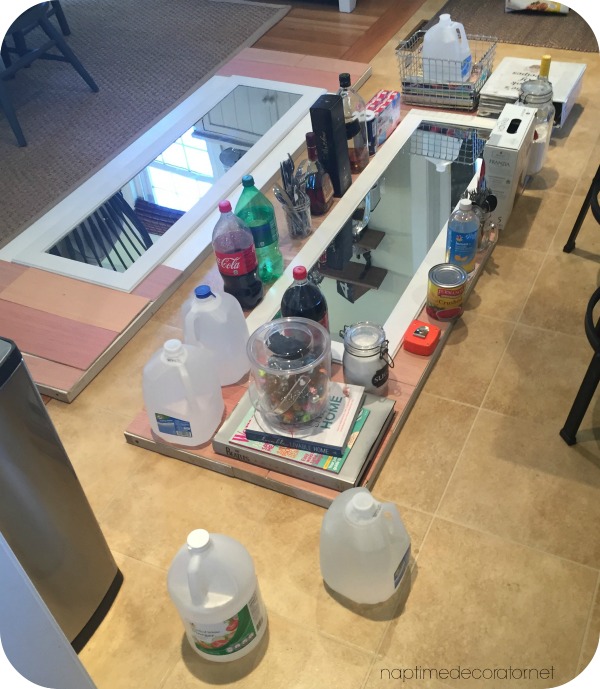
I had the saw set up in the basement (less dust in my kitchen that way), so I basically measured my plywood and ran downstairs, measured and ran downstairs, measured and ran downstairs. Times A MILLION. Then I used the same Liquid Nails, and secured all the pieces. Annnnnd then used my super professional method of ransacking my house to find any and all even slightly heavy objects to weigh it down. (I used the same plywood I used for Plank Wall #1 in the basement, and Plank Wall #2 in the bedroom)
I knew I saved those leftover flat sodas from our Easter party for good reason;)
And basically we left everything as is in the middle of our kitchen for a day to dry and set. Funny thing is, my husband and kids didn’t even bat an eye. Just Mom up to her ol’ tricks!
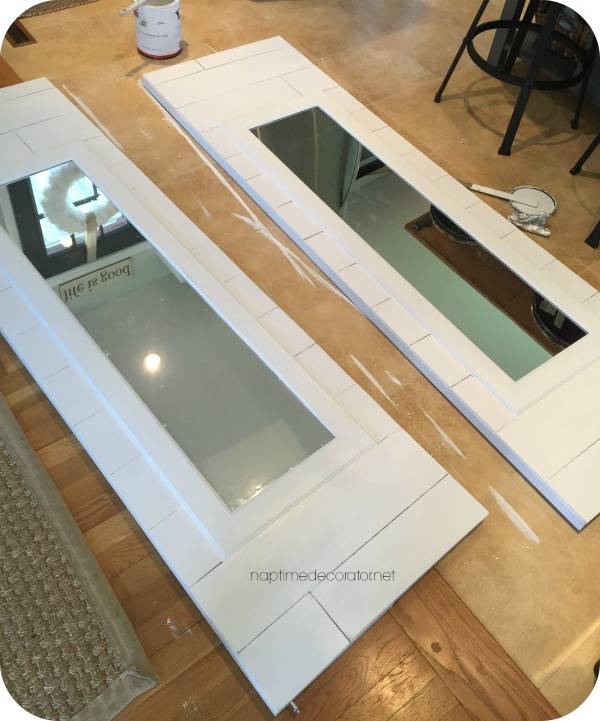
The wood wasn’t perfect (not my best idea to do these cuts after 3 cups of coffee), so I caulked around the mirror and sides…

…then the next day I painted them, using my Paint and Primer in One, Behr ‘White’.
Do as I say, not as I do…messiest painter ever. Sometimes I just get too excited and decide to clean up at the end, rather than lay things down first. Or maybe it’s just that I want to ruin our kitchen floors so we *have* to get it replaced;) hehehehe…
And now, moving onto Phase 3. This was the scariest part of it all. WOULD THEY HANG??
My husband screwed them back in, and YES! They hung back up!! But of course they swung open – nothing securing the ‘french doors’ in place. So we needed some sort of magnet thing – like the kind for kitchen cabinets. Or at least old school 1965 kitchen cabinets, like the ones we have.
This is kinda funny – I went digging in the old blocks bin from the toddler era, and found the perfect sized block to use so we could magnetize the doors. And it’s blue;)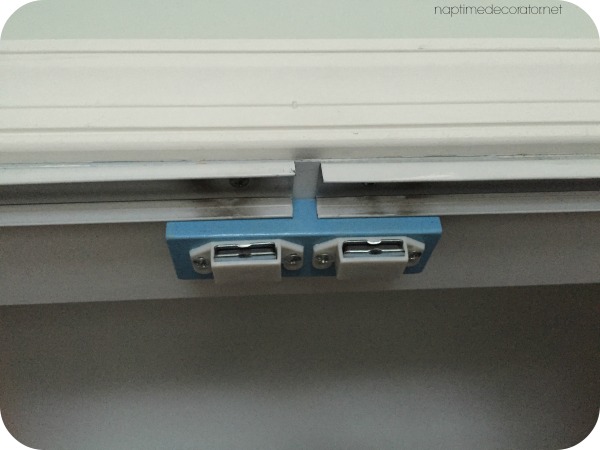
You can’t see it at all, but I plan on painting it white anyway. As you can see in the photo, we screwed the magnets in, then the piece on the back of the actual door: (in all fairness, I’m saying we, but my husband did this part) 😉
Lo and behold, the doors shut, stayed closed, and OMG MY CRAZY IDEA WORKED!!!!????
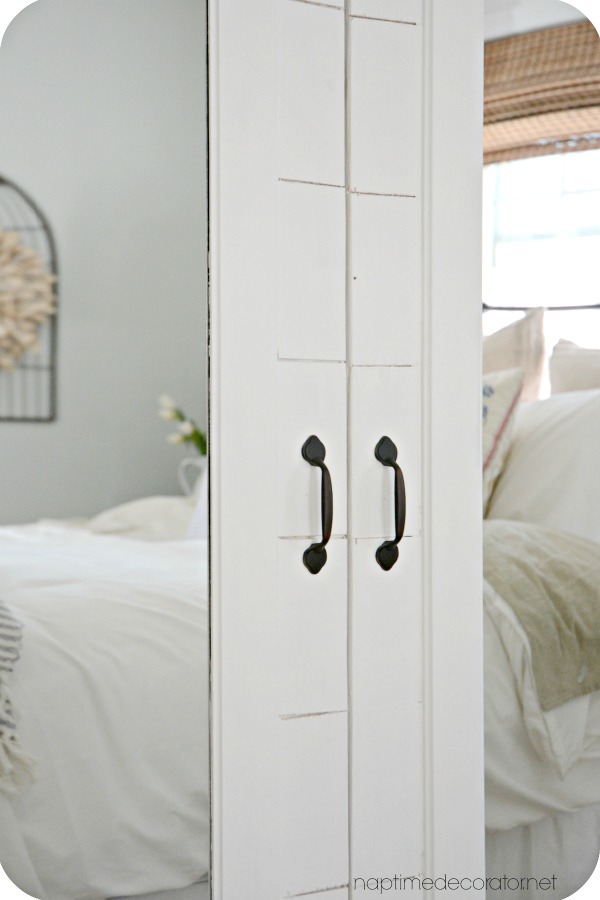
Time for the finishing touch: new handles.
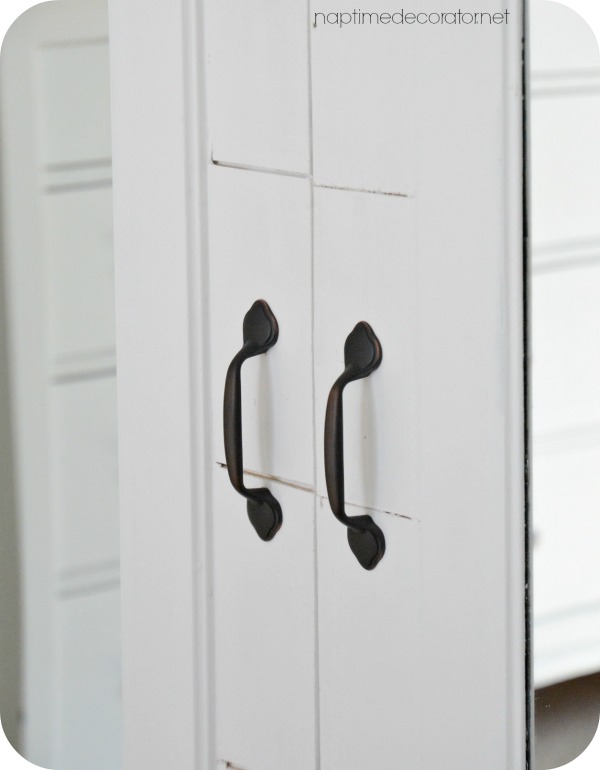
Wanna see?!!!
Ta-da….
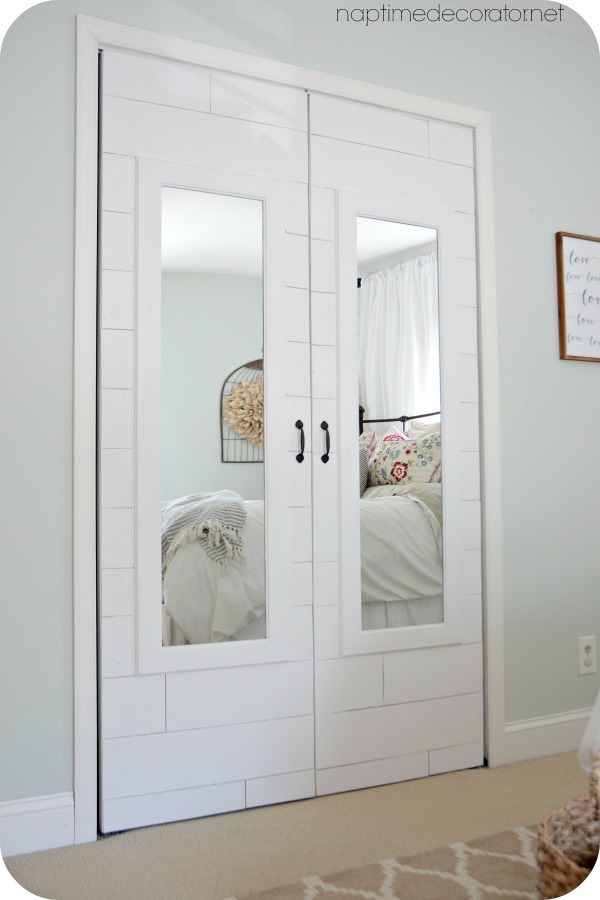
ACK! I still can’t believe it worked. I’m holding my breath, waiting for the doors to fall off, or something to come unglued or…something…I will keep you posted if they do in case any of you want to give this project a go! My hope is that a year from now, I’ll be editing this post, saying, ‘IT’S ALL GOOD! Doors are still working like a charm!’ We shall see…;) For now, they are working out beautifully, and looking so much prettier!
Now…you know what this means, don’t you? This was THE LAST project for the bedroom, so now I can get to snapping pics and editing, and POSTING THE REVEAL!!!! Stay tuned – it’ll be up sometime this week!

And I can hardly wait to show you:) Have a beautiful day, friends! XO

 Hi there! I’m Liz, a former teacher-turned-stay-at-home mom to three kids, with a passion to create a warm and inviting home on a budget. This blog all started when I’d put the babies down for a nap, and squeeze in a project during those precious couple of hours! My hope is that you visit this page and feel inspired to do a little “naptime decorating” of your own. Thank you so much for stopping by!
I am impressed. I thought mirrors on closet doors was so 70’s, but they look modern and beautiful!
Okay, I have to admit that this is the first time I have read a post of yours and thought, “I think she has really lost it this time.” HAHAHA!! But, they look beautiful! You have such a creative eye! I never would have thought this up in a million years!
Love, love, love!!!
WOW! I was holding my breathe reading the post as I kept waiting for “the glue didn’t hold and the mirror broke into a zillion pieces” but these are AMAZING! Joanna Gaines would be so proud of you (and maybe even steal your idea – just wait and see!). Love it! Can’t wait for the room reveal!
Wow! Love this! We have ugly wood veneer bifolds at our beach place. This would look amazing!
The doors look amazing! Totally tempted now to try this to mine!
Where there’s a will, there’s a way, right? You were determined, and you did it. Yea!!! Fantastic job, as always. What’s next?
Omg gorgeous ! I have 4 sliding panel doors in my laundry same look as your original bifolds …was thinking about a barn door but this looks amazing !
Thanks so much!!
This looks great! My room is Sea Salt as well, but I was searching Pinterest for this type of idea of making my bi-fold doors into opening doors both for my bedroom and my kitchen n pantry.. Have you found that they are still staying in place or have you had to attach them to the door casing in a different way?
Thank you! They are still up and functioning! One of the doors seems to drag a little on the carpet – not sure what that’s about, might have to rethink the hanging there, but the other door is still 100%!
AMAZING!! Love how these look!
WOW that was a great project I was thinking of doing my little laundry doors and you have given me some great tips and ideas. Congrats you did a marvelous job and the room looks good. well done
Very Nice!!! Thanks for the post; getting the courage to do the transition myself!!