Ok, let me explain that title.
One day last week, after making my DIY Happy Fall Easy-Peasy Banner for the Decorative Window, I moved this cute little wreath to that spot on the wall to the left of it…
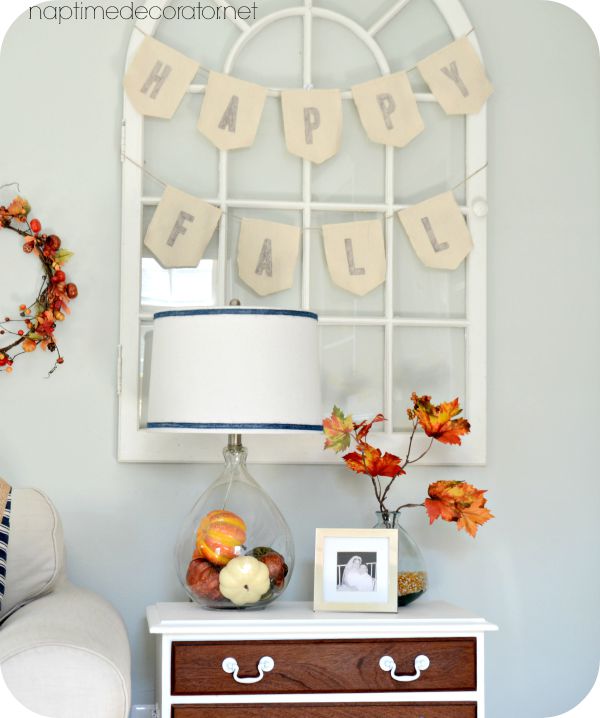
Ok, you can only see half of it, but you get the point.
That little wreath was previously hanging on my bird cage thingy in the family room.
Which means, that bird cage thingy was now empty.
Hmmm…
I needed something on there, like yesterday, because you know me. Patience is not my strong suit when it comes to this house. Especially the family room where I spend so much time. Looking at that blank space was driving me batty and I NEEDED. TO. FIX. THAT. NOW.
I decided to come up with a challenge for myself. Could I possibly come up with something to hang on there without buying one single thing?
I started thinking. No more words or banners, because that room already has enough. No more leaf wreaths, for the same reason.
The wheels started turning and I had an idea!
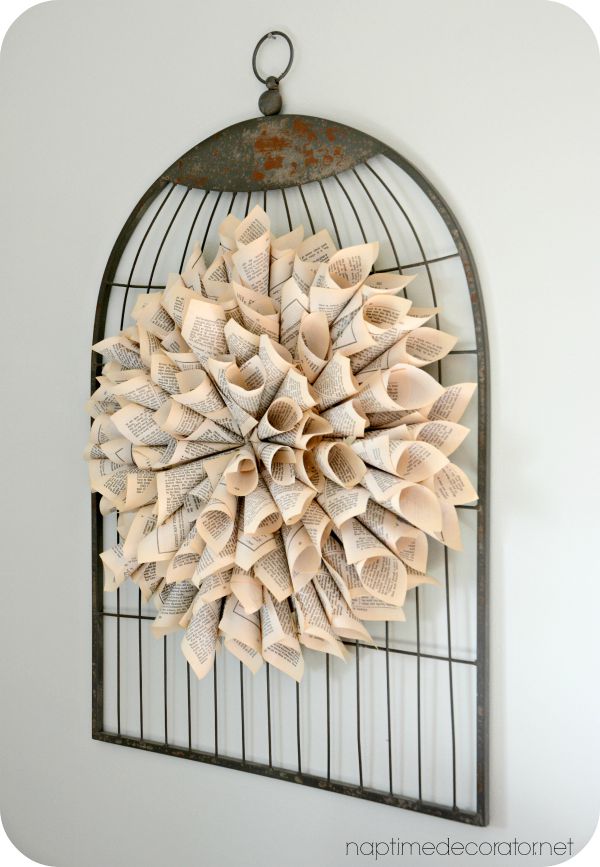
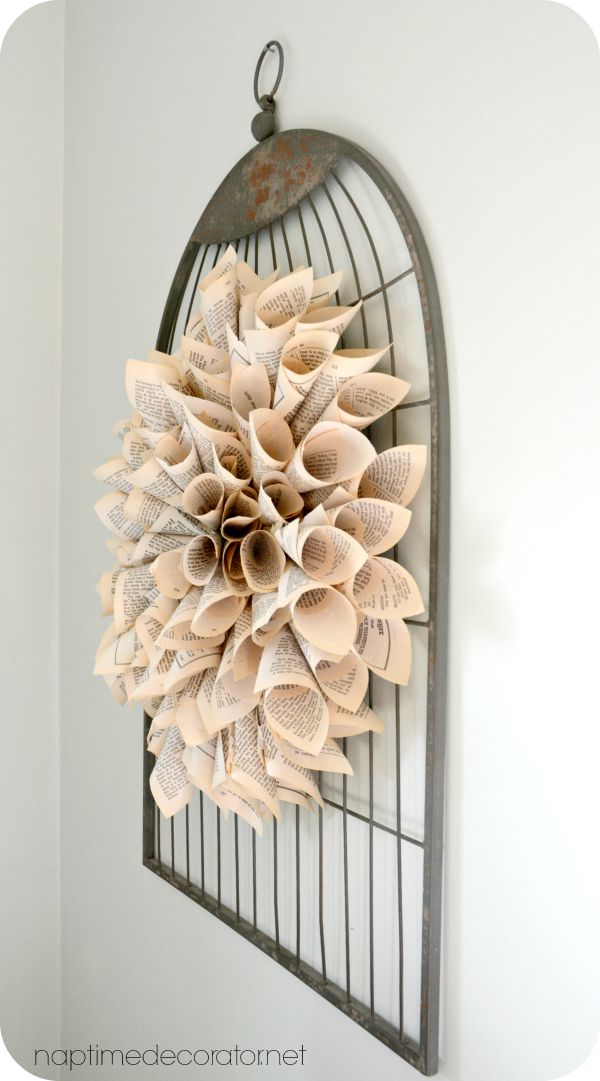
A book page wreath!
I made one of these a while back for my mom, using music sheets…
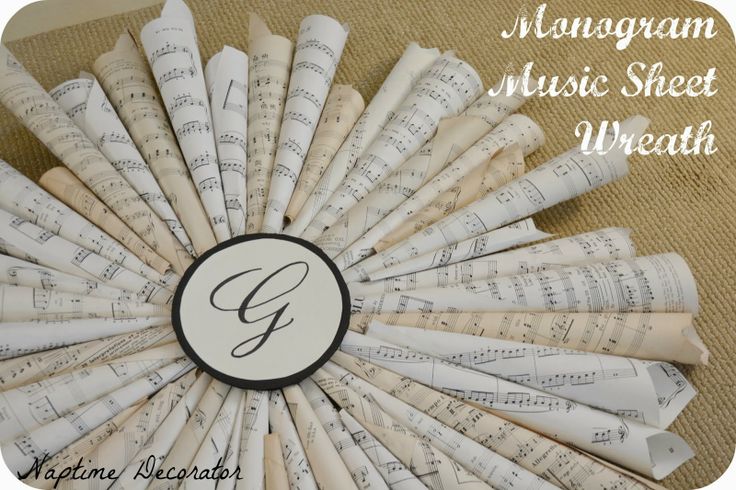
(sadly I can’t link up that post because it was deleted in the Great (Awful) Blog Hack of 2013.)
…but had yet to make one for this house. And how perfect to have a book page wreath in our family room where we love to curl up and read?
Luckily, I’ve got some old books in a box – you know, those paperback books that you’ve had for decades and they come with you when you move, and kinda never leave the box because they’re falling apart? Recently I donated a bunch of them, but there were a couple stragglers that remained. And one just happened to be so old the pages were yellowing. MAJOR win. Looks all vintagey.
I used a small paperback book (this one actually was seriously falling apart so I figured it’d be a great one to use), cardboard, some hot glue, some masking tape, and scissors. ALL of which I had here. That’s right. It cost me absolutely ZIPPY to create this…
I mean, that’s a substantial size wreath for costing me not one single dime, am I right?!
Here’s how I did it.
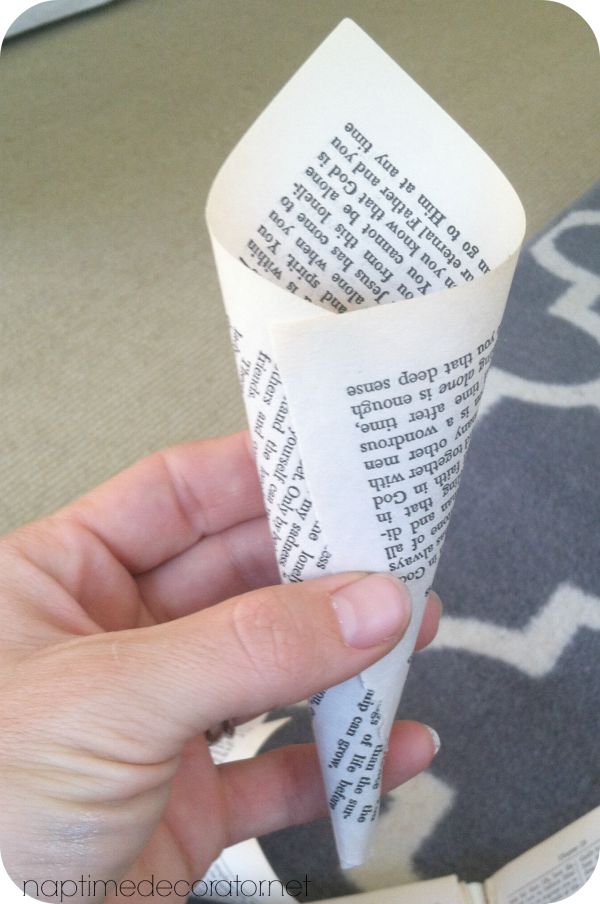
I ripped out a bunch of pages from the book. (I know, I can hear the book lovers cringing all over the world. I’m one of the biggest book lovers around, promise – I’m in not one, but TWO book clubs – books are precious. But since this one’s falling apart anyway, I figured I’ll enjoy the book THIS way now:) Still brings me immense pleasure, just as it did in it’s previous form. That’s something, right??).
Ok, now that I’ve gotten that off my chest.
Then, let me share with you what I did differently with this wreath than my mom’s. Instead of dabbing hot glue the ENTIRE time as I made the little cones of each piece of paper, I used masking tape to secure them.
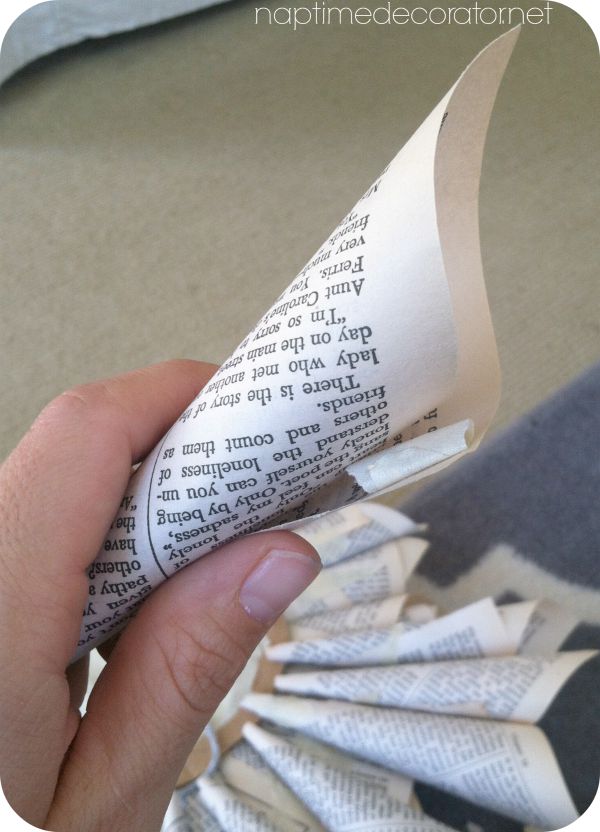
This was actually a happy accidental discovery. I was afraid I’d run out of hot glue sticks for my glue gun, and we know I was challenging myself with a 100% freebie project. So I decided to save as many sticks as I could, and do it this way. It was soooo much better. 1) It wasn’t nearly as messy. You know how those glue guns can make so many strings? Not with tape! 2) I didn’t feel as rushed. I could make those cones at my pace, while watching last night’s Tonight Show with my boyfriend Jimmy Fallon. And *possibly* rewinding and rewinding again his Lip Sync battle with Ellen, without the glue gun plugged in waiting for me to keep creating a ton of cones. I mean, how many times can one watch Jimmy do the Whip and Nae Nae? The answer is NEVER. NEVER ENOUGH.
I made a bunch and stapled them onto a cardboard circle. In hindsight, I totally created more work for myself with the cardboard. I didn’t realized at the beginning that I wasn’t going to have a hole in the center. So I ended up filling IN the hole I cut out so I could add more to the center! DOH! So if you try this, just cut out a circle of cardboard, and don’t worry about cutting the center out! That’s the only layer I stapled, because you don’t see that layer. For the other layers, I dabbed hot glue and secured them.

Then I hot glued more cones to make a smaller layer. And here’s how it looked:
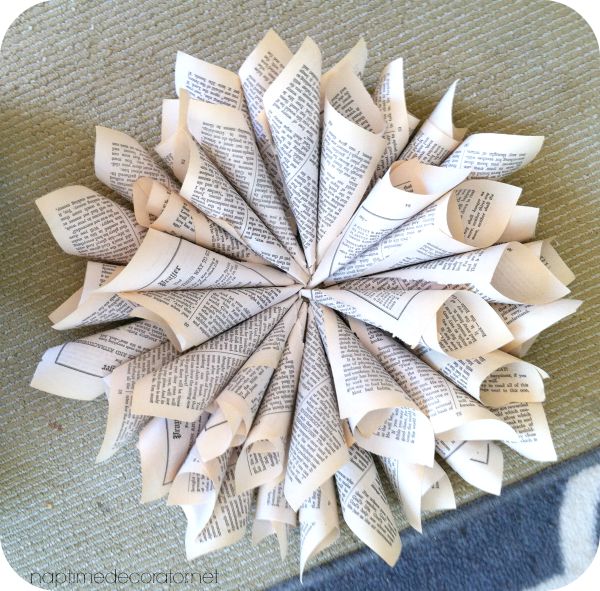
Cute, but wasn’t 100% in love yet. So I cut pieces of the book pages in half, and made a layer of smaller ones for the center.
And it looked good. I hung it on the bird cage thingy and it just wasn’t big enough. Wasn’t making as much of a statement. So then I took it down, turned it over, and added ANOTHER layer around the outer edge to make it bigger. So if you’re keeping track, there were four layers total.
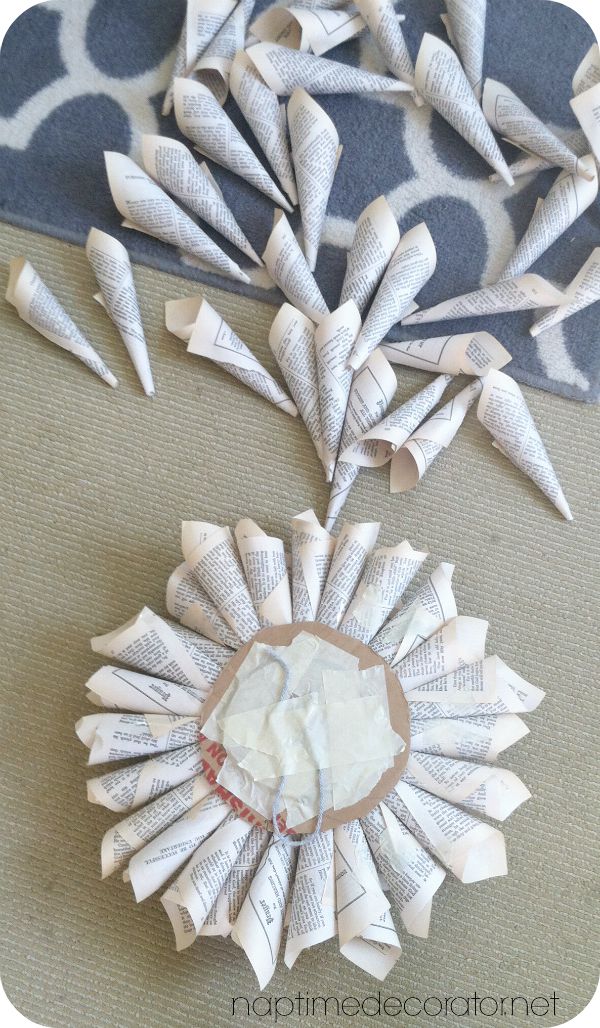
Yes, I’m fully aware of how unprofessional it looks from the back. And I’m totally cool with that. I mean, WHO is going to come to my house and see that? Nobody.
Instead, they’ll see this!
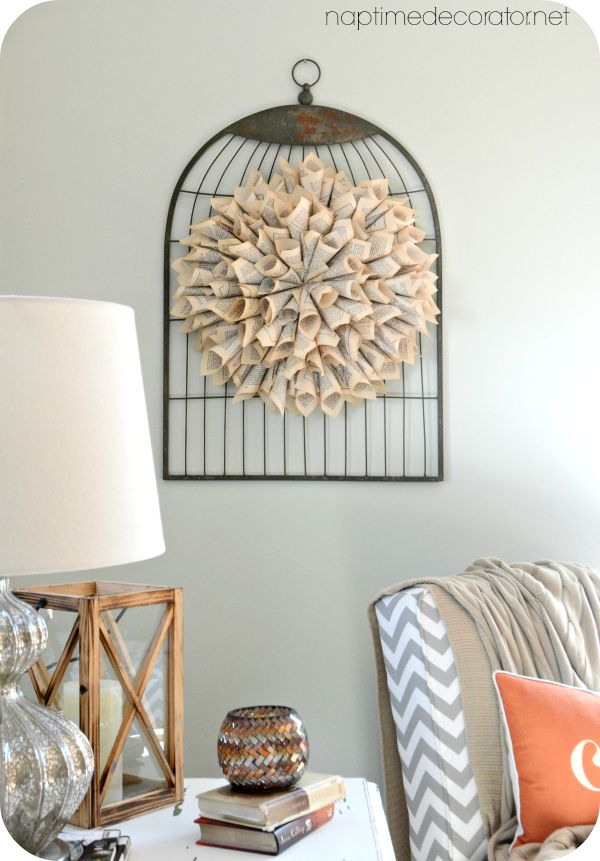
I hung it by simply cutting a small piece of that green ornament wire stuff and sticking it through the cardboard, then looping it around one of the “cage” bars. Make sense? Sorry, not the most clear explanation!
And since it’s not technically a wreath, I called it a starburst/sunburst because that’s what it looks more like to me. And while we’re on the subject, is it a sunburst or starburst? I really should know that, being a home blogger and all.
ANYWHO….whatever you wanna call it, I’m digging this nice new addition to our family room!
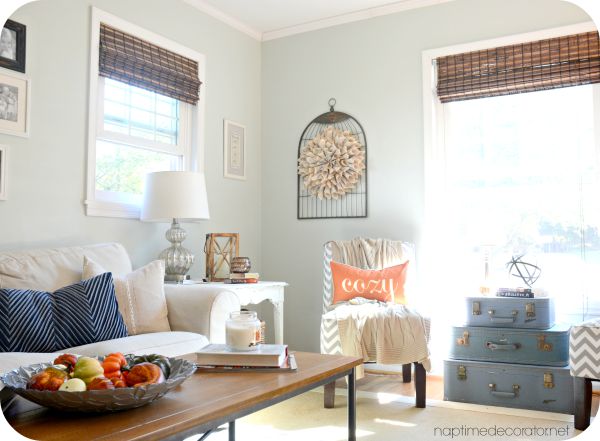
And I’m totally digging the price tag! 😉

 Hi there! I’m Liz, a former teacher-turned-stay-at-home mom to three kids, with a passion to create a warm and inviting home on a budget. This blog all started when I’d put the babies down for a nap, and squeeze in a project during those precious couple of hours! My hope is that you visit this page and feel inspired to do a little “naptime decorating” of your own. Thank you so much for stopping by!
Gotta love a freebie! I think it looks great. It adds texture and is the perfect color for that spot.
Thanks, Nicole!
Love it! Such a fun project (and love the non-pricetag!)
Thanks, Lynn!
I absolutely love this and intend to make one for our home office/library! Thanks! This was my first time reading your blog and I think you are awesome.
Thanks so much, Jan! Good luck with your wreath!
This is gorgeous! Do you find that it gets dusty? I think it is the perfect style for my old farmhouse, but worry about keeping it looking nice. Have you found it easy to keep clean? Any tips? Loving your blog and your style. Thanks for sharing your ideas!
I haven’t noticed it getting dusty…then again, I’m a pretty bad noticer of dust;) lol! Thanks so much!
LOVE! Where did you get the flat birdcage?