Oh MAN you guys! I’m so excited about this post I can’t even tell you! It’s been something I’ve wanted to do forEVER and I finally bit the bullet last week and tackled it!
BY MYSELF!!!
Usually when there’s a big project (which pretty much means anything more involved than say, a) hot glue gun b) spray paint and c) sander, I call in the big guns, aka my husband. Power tools have always freaked me out, so I let him handle anything that involves wearing protective goggles, know what I mean? But as you can probably relate, there is NOTHING busier for a family of 5 than Fall Weekends. Am I right? Sports all weekend, pumpkin patches, Halloween parties…there’s just no time for the ND Honey-Do list these days. And I reeealllly wanted to get this done. So I started thinking to myself….
Waaaiiiiiit a minute. I can TOTALLY do this myself! I have the time during the week to tackle it. YES!
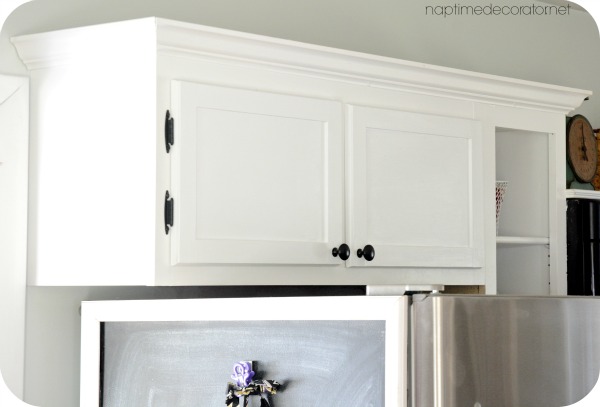
If you read the title, you know what I’m talking about by now, but in case you haven’t figured it out – I took our 1960s cabinets that have ZIPPY personality (I mean, what was with that decade? Skinny baseboards and flat front cabinets? Painful.) and gave them some character with a little trim.
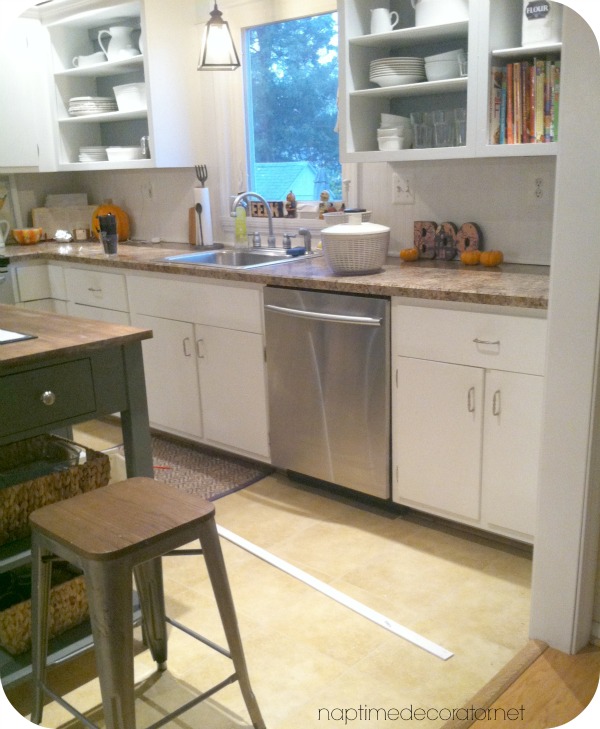
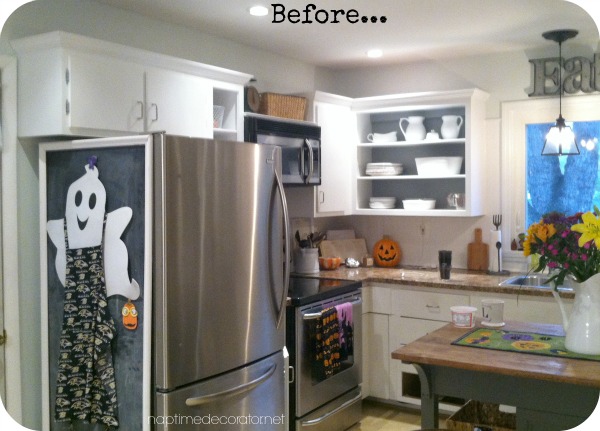
So what looked like this before:
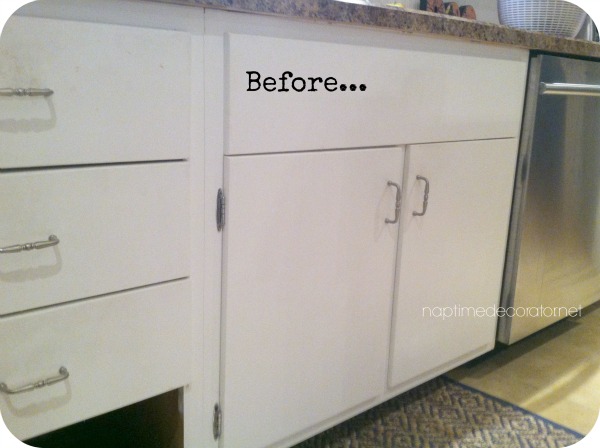
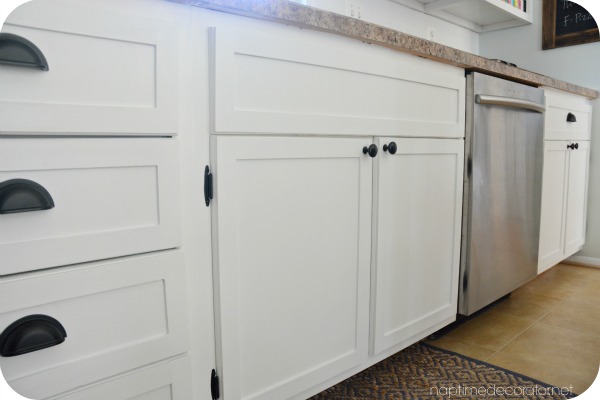
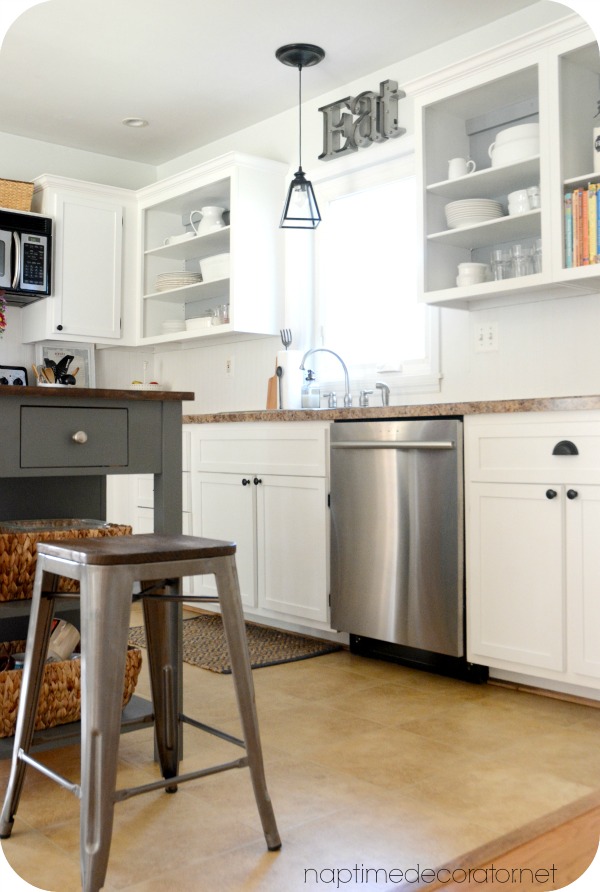
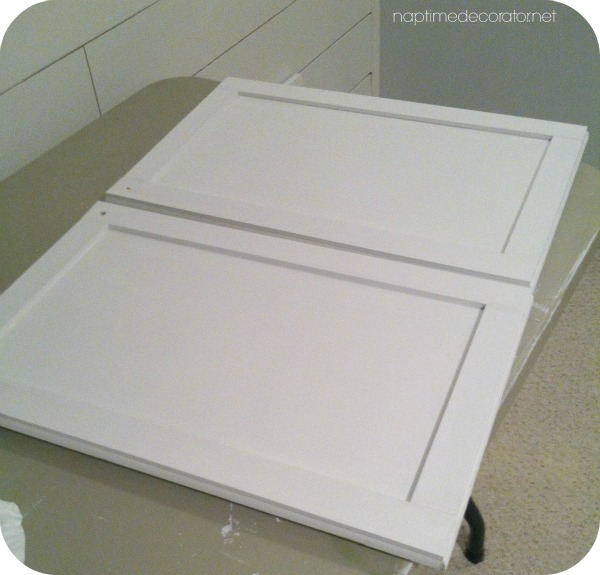
Now looks like this!
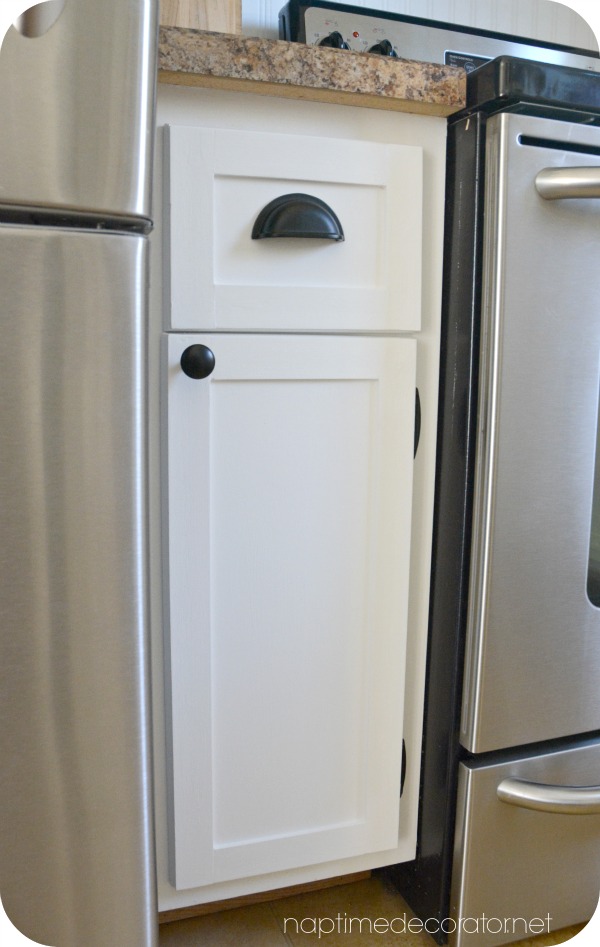
And what used to look like this:
Now looks like this!

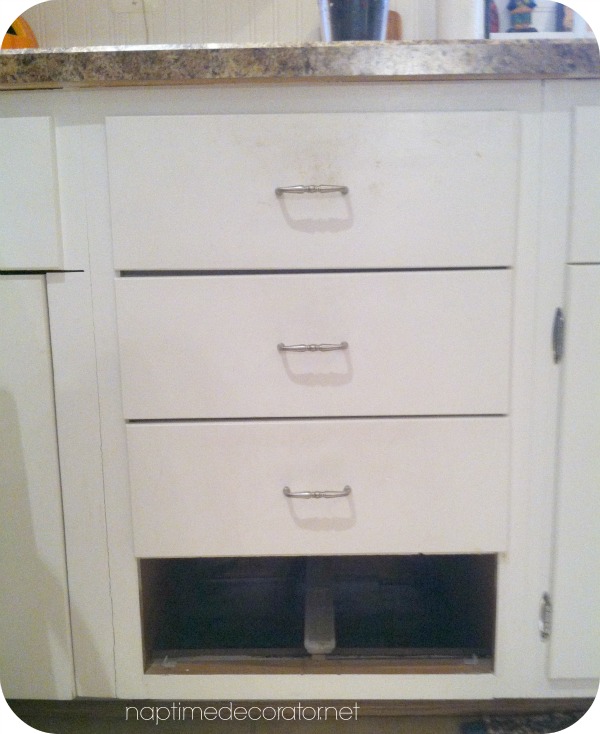
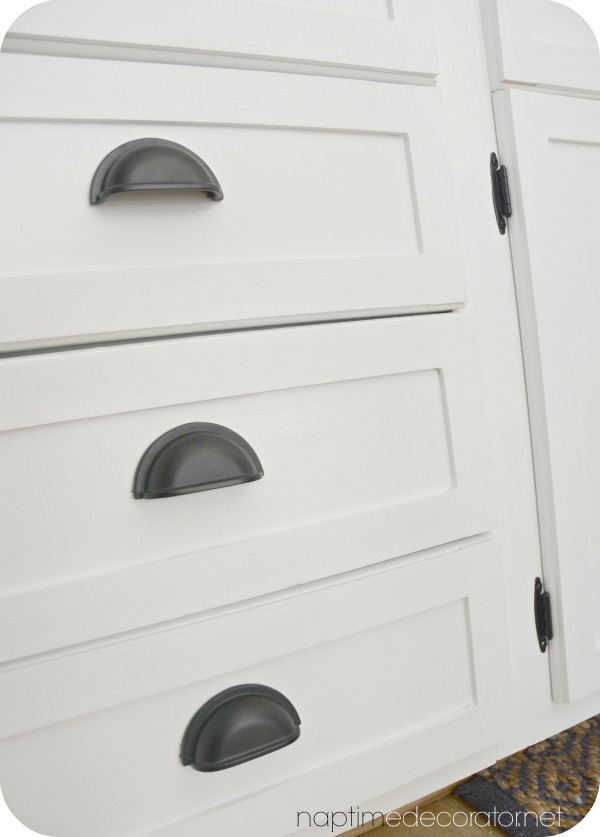
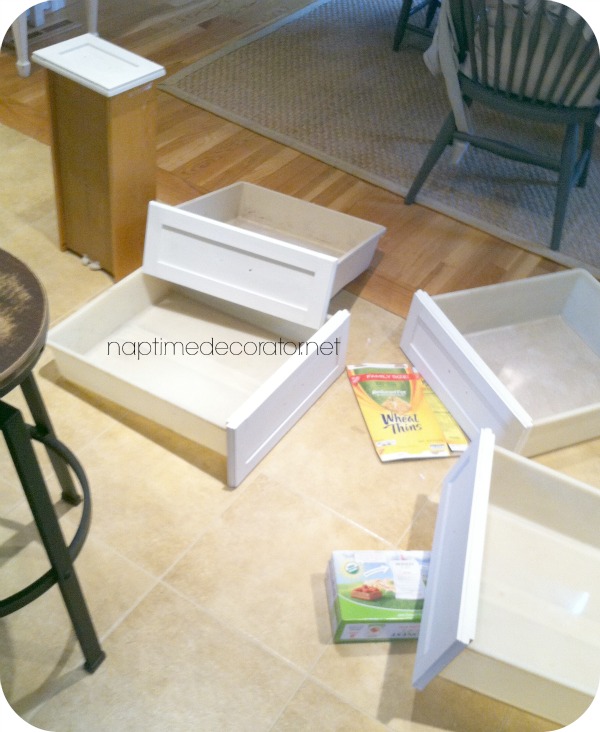
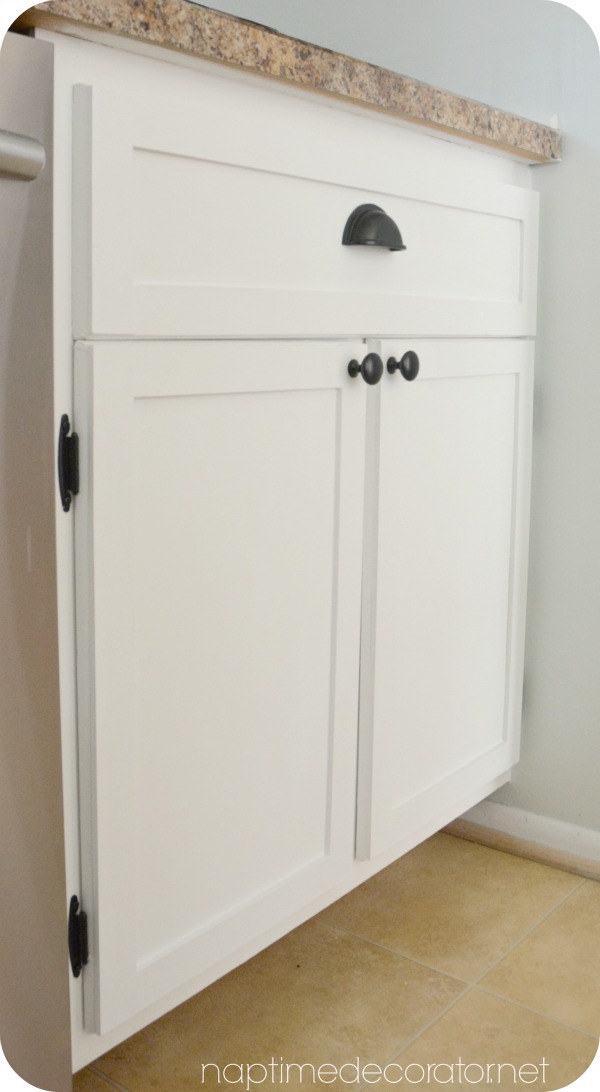
And these drawers, once plain and boring (and desperately in need of a new paint job!)…
Now, freshly painted and full of life!
Before:
And after!
I could keep showing pictures until the cows come home, I love it so, but you probably wanna hear how I did it?
First, I borrowed my awesome friend and neighbor’s portable circular saw. Remember that photo I posted on my Instagram and FB page?
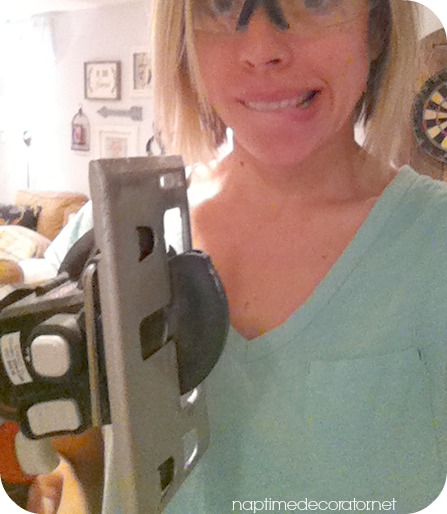
I was a little sceeered. 😉
But I had my husband give me a quick lesson the night before, and I was ready to get these puppies done!
Rewind a couple weeks to a Lowes trip (aka my second home these days). I looked around the wood section and tried to find the perfect something for these boring cabinets of mine. I spotted this perfectly thin trim that’s about 1.5in wide. I picked up a few pieces of these 8 footers and after much thinking about it with the hubs, we decided it was the way to go.
I know myself, and I know I would go positively cuckoo with a kitchen of naked cabinets (and all the drawer stuff all over the house) so I decided to split this up into the span of what became three days. Day 1, I started about 11am and got all the drawers done before the kids came home at 4. Like, knobs in, DONE. Day 2, I did half the cabinets, got the knobs on, back on hinges, DONE. Day 3, the other half. This way works well for me. Because I’m a little cray. This is not new information.
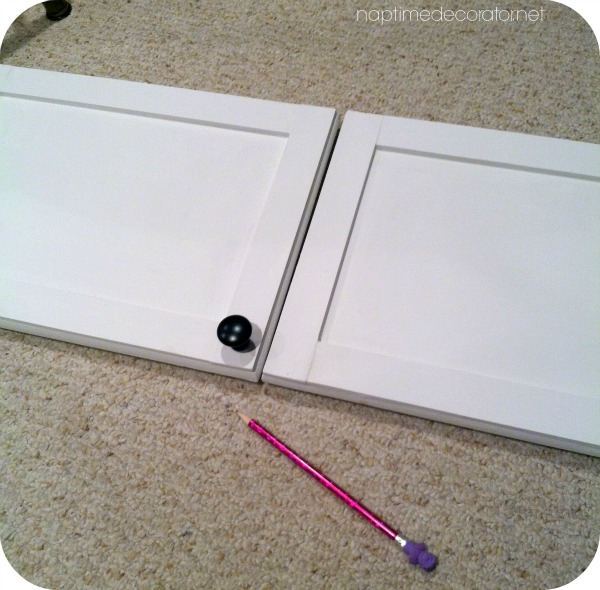
So I pulled out a drawer and marked on the trim how long the piece needed to be. I cut two pieces like that, laid them on the drawer, and measured the other two pieces – the top and bottom. And I CUT THE WOOD! (Sorry, I’m obnoxiously excited and proud that I did this all my myself. Just ignore me).
And since I did it by myself, there are no photos of this step. My apologies:(
A little wood glue and clamped that bad boy up and just waited for it to dry. Didn’t take long – maybe left it for 30 minutes?
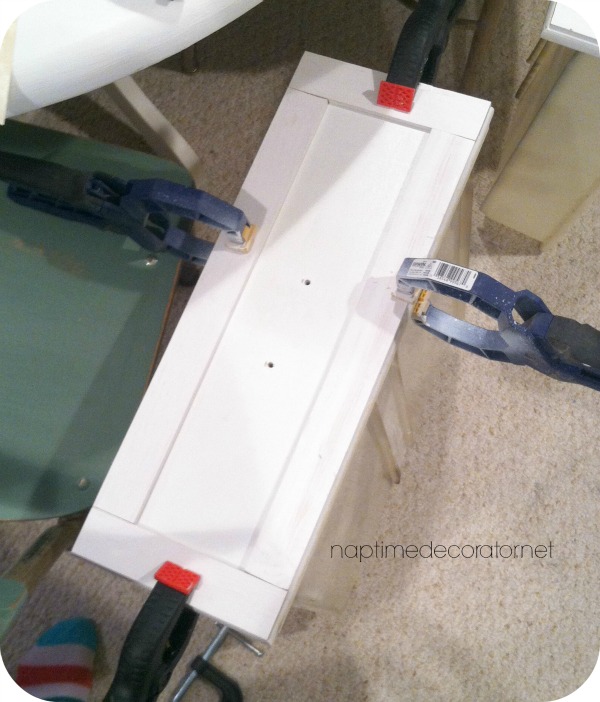
And I kept going until I ran out of clamps. Another reason why I’m glad I split it up over a few days!
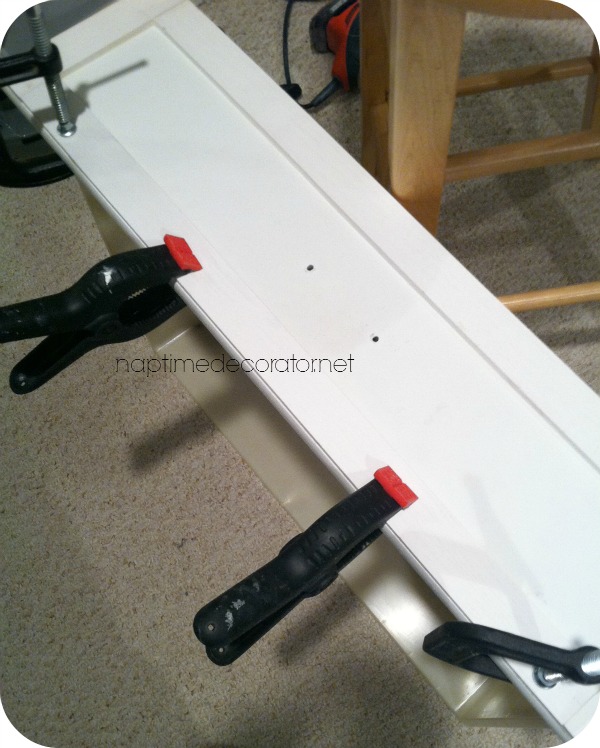
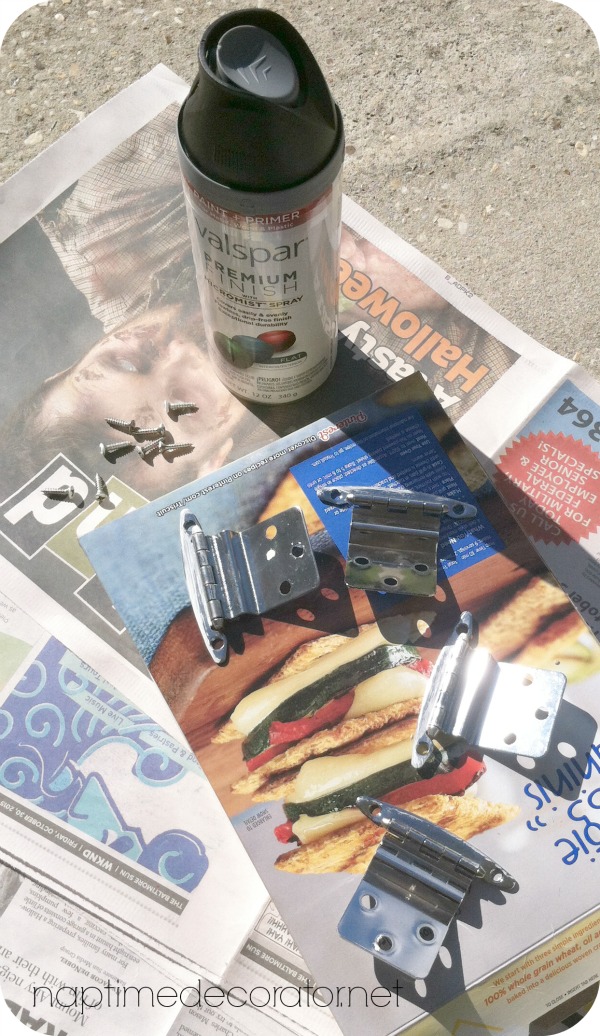
Once the glue was good and set, I removed the clamps and caulked where I needed to. I’ve said it before, but caulk is your BEST FRIEND. Then I got the knobs out and drilled the holes for the new knobs. (Ok, full disclaimer, the hubs helped a little with this one;) ).
Then, it was time to prime and paint!
I just used whatever the cheapest primer at the store was and Sherwin Williams White Semi-Gloss.
Oh! While things were drying, I took the hinges outside for a quick blast of black spray paint. I love the paint and primer in one, and used Flat Black. I also sprayed it with a clear protective coating (that was satin finish – that’s all I had and it looks perfect).
And that’s about it!
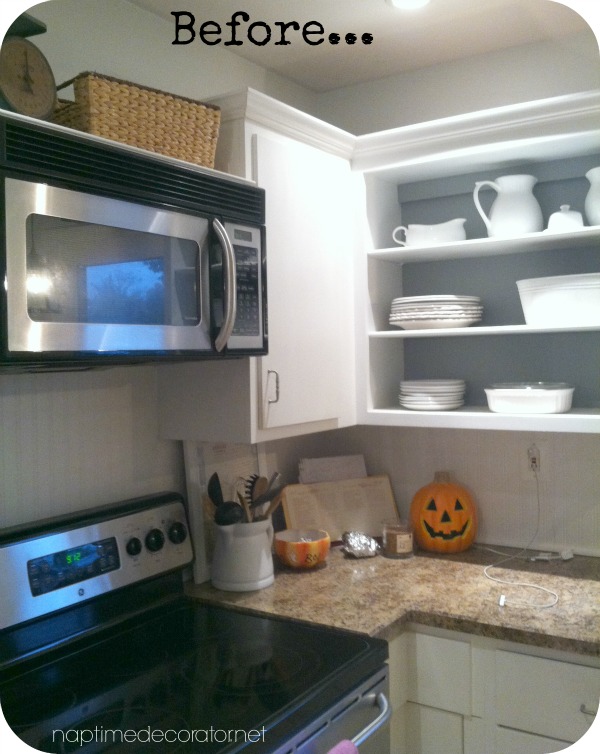
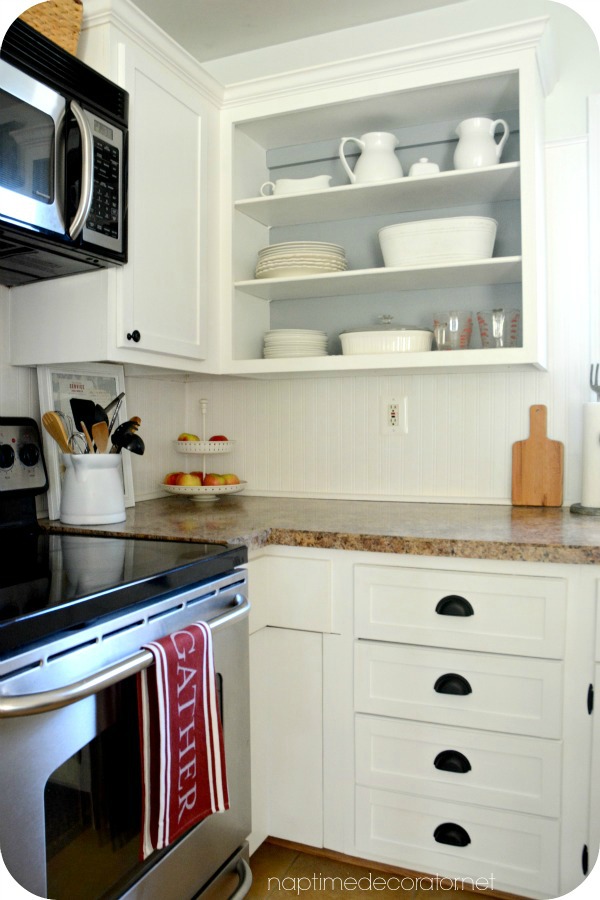
Another before…
And here’s what that little cabinet above the fridge looks like now:
It’s hard to believe these are the same cabinets, original to this house:
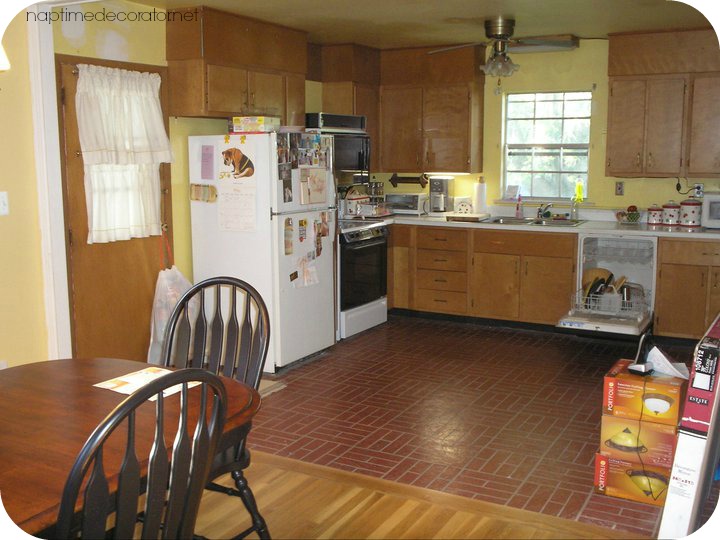
That were then painted a creamy yellow a decade ago when we moved in…
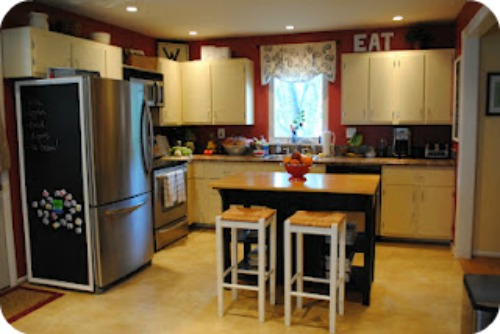
Then updated with white paint and some crown molding a few years back…
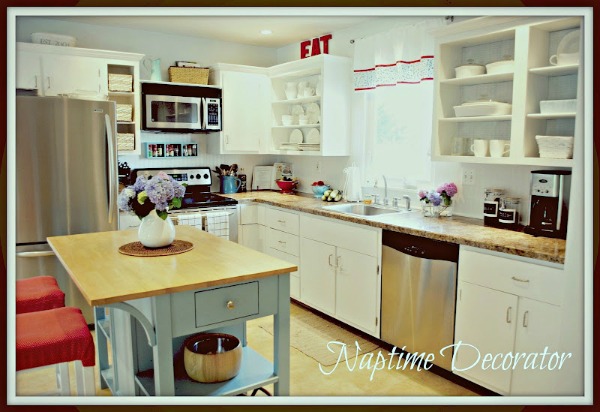
And now today!
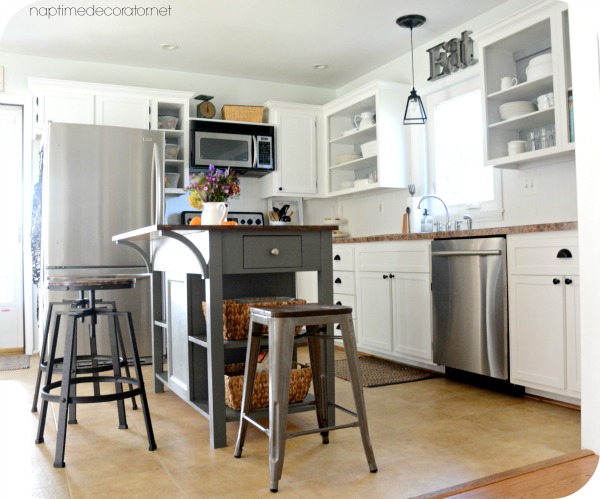
This is a good lesson in making what you have work for you. I mean, would I love new cabinets that weren’t all a little ‘off’ and had all that fancy slow closing business? Sure. (See that middle one there? Well, turns out I should’ve drilled the hole for the new knobs in AFTER hanging them back on the hinges – nothing’s perfect in an older home!). But do we have it in the budget to demo this kitchen and start over? Nope. But I was tired of the dated look. I ended up needing 9 pieces of trim, so this new look set me back about $72. Not bad when you consider what new cabinets would cost!
I’m SO glad to have finally gotten this project done – I could not be more thrilled with how it turned out. And that I finally conquered my fear of power tools. Very exciting. The sky’s the limit now, friends!
😉

 Hi there! I’m Liz, a former teacher-turned-stay-at-home mom to three kids, with a passion to create a warm and inviting home on a budget. This blog all started when I’d put the babies down for a nap, and squeeze in a project during those precious couple of hours! My hope is that you visit this page and feel inspired to do a little “naptime decorating” of your own. Thank you so much for stopping by!
Nicely done Liz. You continue to amaze me!
Awww, thanks! 🙂
Liz and power tools?! And I thought Kanye 2020 was crazy!
hahaha, I know right?!
what paint was used? any primer or sealer? any tips to keep the paint from holding lines?
It’s amazing the difference some trim makes! Maybe that’s what my gross-o laminate cabinets need! (Other than a total demo!)
So, did you use oil-based or latex paint?
Thank you! I used latex.
Looks great! And, is it just me or does the crown molding stand out more now? I actually thought you just now added the crown molding, until you showed the transformation over the years at the end.
I agree! Thank you:)
What is the name of the paint that you used on your island?
Sherwin Williams Grizzle Gray
Excellent job! You really need your own DIY show!!! You already have your fan club!!!
Hahaha! Thanks, Lynn!! 🙂
Beautiful! I can’t stop looking at your pictures! You have really inspired me to see the beauty I can make in my home.
Thank you so much, Jan! I’m so glad!
I wanted to do this in my previous house where we the 1960’s flat cabinets. We couldn’t because the edges of the cabinets were rounded! These look perfect!
Thanks so much! These are actually rounded too – my husband was doubtful because of that reason, but turns out, you can’t really tell! 🙂
Great job! Love it! Do you know the thickness of the trim that you used??
Beautiful job. Where did your kitchen island come from?
Thank you! We got it from a place called Barewood House in Eldersburg, MD.
I love what you did. Such great ideas.
Thank you so much!
I have been wanting to do this to my cabinets, and now I have your beautiful work for motivation. THANKS!
I would love to know where you got your kitchen island. It’s exactly what I’m looking for. Thanks!
Bought it about 10 years ago from a place in Eldersburg, MD called Barewood House.
They are beautiful! Makes me inspired to do the same thing with my bland cabinets.
thank you!
Wow. Not to often I leave comments but I just stumbled across your site and am soooo glad I did. I have been reading and looking at your posts for over an hour already and this is the second comment! Wow. I must say, you really have an amazing eye for decorating and all that goes with it. I love your style and the makeovers you have done so far. I mean just amazing!! But it’s also your sense of humour and also that you are very real and down to earth and you were not afraid to show that of course your house is not perfect at all times it gets messy etc. I am like totally addicted to your blog now and must say, your are the Queen of makeovers and decorating. LoL. Thank you for showing us your tips and tricks and having is in your home, and keeping it real. God Bless!!
You are so sweet! Thank you – you made my day:) So glad to have you here, welcome! XO
I now can show my husband you can do this and it looks great. Did You spray paint? I always am painting something and end up with brush strokes. Thank Judy
I am dying to do this to my cabs and drawers…..my drawers are kind of rounded on the edges…ugh…should i try to just square them off with sand paper
Mine were slightly rounded too – ended up not being able to tell!
I loved your idea until I realized that my 1959 cupboards have a rounded edge to them. I cannot see it in your pix. was it curved? they look great and I would do it in a heartbeat but the edges are not straight and flush. you did an amazing job! they look fantastic.
thank you.
Thanks, Pat! Mine do have a slight rounded edge. Maybe try getting just one piece of trim and laying it on top of your cabinet and see if it works for you? Good luck, thanks so much!!
Wow! I just came across your site. I have similar old 1960s cabinets. I am really thinking about giving the cabinets a face lift like you have done. Thanks for all your pictures. Did you put any protective coat on the new white paint? Did you sand down the cabinets before priming and painting? What are some things you would do differently now that you’ve gone through the process?
Hi Joyce! Thank you! No, I didn’t put on any protective coating. Just make sure you sand, prime, and paint and you should be good to go! Good luck!
I am thinking about doing this to our flat-faced cabinet doors and drawers too and I have a couple questions. I’m told that Lowe’s will cut the wood for you, as long as I provide them with the needed measurements, do you know if this is true? I am also afraid of power tools, so i’d like to avoid that at all cost (my husband is NOT handy, but he’s still a keeper ;)). Secondly, I’d like to keep mine the same color so they match the area around the doors/drawers and sides of the cabinets. What do you recommend for this? Did you use spray paint for the doors or did you use regular paint and brush? I’m a bit nervous about putting the hardware back on the cabinets (since the drawers would just go in the same place, right?). Thank you so much for sharing this, VERY helpful!! 🙂
Also, what type/brand of wood glue did you use?
Love it just what my cabinets need. I did see a remark someone made about when you do this the extra thickness prevented the cabinets from opening all the way, was wondering if that was your experience. Again love it great job.
Thank you! Not an issue for me at all – they open just like they used to before the trim:)
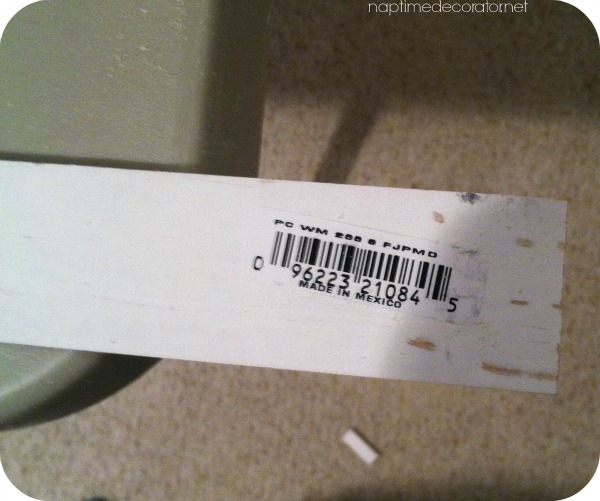
Your Kitchen looks great! I love what you have done to your cabinets.Can you tell me what type of trim you used and what the measurements are on the thickness of the trim? I printed the picture of your trim and took it to Lowes and they had no idea what it was..I found a piece of mdf that was 1 1/2 in. but looked too thick.I would appreciate any info
I found something called lattice trim but it felt like plastic but I wasnt sure if that was what you used?
Thank you! You should be able to show them the photo with the number on it and they can look it up. Good luck!
im tackling this exact same project in the next few weeks!! i have the same flat cabinets. How do you find the glue is holding? im so excited for this task, but the nail gun idea is scary and i dont have one so im hoping glue is sufficient. What kind did you use? Thanks so much!! Love coming to check your blog!
It’s holding up great! Just make sure you give the glue enough time to set – if you lift the clamps off and the trim moves, that’s not good;) I used wood glue – not sure what brand, but any of the ones at Lowes or Home Depot would be fine! Good luck!!
Great job! Love it. Will check out your other stuff now… 👍 Bet I’ll get Lots of great ideas!😊
Thanks so much, Carol!
Looks amazing! I found on here that you used latex paint on the cabinets but I am wondering what finish (semi-gloss or satin or ??) and was the white just a plain white or a variation?
Thanks!
thank you! Just semi-gloss off the shelf!
Looks great. Is the hot glue gun a necessity? You can’t just use gorilla glue?
Thank you! I didn’t use a hot glue gun – used wood glue. Gorilla glue usually expands, so not sure if that would work or not, but maybe you could test a small inconspicuous spot?
According to the article wood glue was used not a hot glue gun.
You know, the original brick floor would look great with the industrial elements of your décor these days. Is it still under there?
I wish it was original brick floor – I LOVE that look!! This was cheap vinyl tile.
Hello! I’m so glad I came across this randomly online because this is exactly the look I’m wanting to do! I have one question – where did you use caulk? Was it in between the connections of the trim? And what kind of caulk? Thanks in advance!!